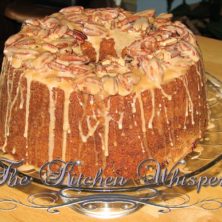
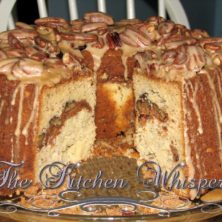
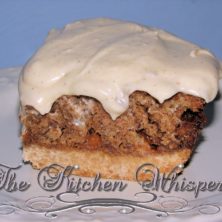
Archive for March, 2012

Happy Birthday to my Mr. Fantabulous!!!

Happy birthday baby!  I love you the mostest of all mostestes!!!

Coconut Shrimp with sweet dipping sauce

There are few things in life, food-wise, that I don’t think I could ever get sick of or have too much of. I mean growing up we were really, REALLY poor so often we had repeats of meals or the same meal every week. Sundays were roast/potatoes/carrots and beef soup. Mondays were hot roast beef sandwiches with mashed potatoes. Can’t remember about Tuesday but Wednesday’s were stuffed peppers, Thursdays were some type of casserole, Fridays religiously was spaghetti and garlic bread while Saturdays were a free-for-all (hoagies, pizza, breakfast for dinner, etc..). Now don’t get me wrong, as I love all of those foods but after eating them riotously week after week you tend to get sick of the stuff. For years you couldn’t get me to touch a stuffed pepper or pasta but as I got older and started to cook for myself I ventured out and went against my ‘norm’ – creamy seafood sauce over angel hair, beef bourguignon, rissotto, etc… THEN it wasn’t until I went to this one restaurant in Pittsburgh about 20 years ago that I discovered Coconut Shrimp. OH MY DEAR LORD! It was if I had a calling! What made them so amazing was the crispness of the coconut with the crunch and thisAMAZING sweet and thick dipping sauce for it.  Now see, I hate, I mean HAAAAAAAAAAAAAAATE cocktail sauce.  I’ll make it and even posted my recipe for it on Facebook but that doesn’t mean I’ll eat it.  It took me years to get it to how it is today.

This one for me is a definite keeper!


Coconut Shrimp with sweet dipping sauce
Print
Author: The Kitchen Whisperer
Find more fantabulous recipes, tips and tricks at www.thekitchenwhisperer.net. Also, join our TKW Family on Facebook
Ingredients
  • 1 cup chunky orange apricot marmalade (if you can’t find the orange apricot, just use all orange)
  • 5 Tsp fresh ginger, minced
  • 1 Tbl garlic, minced
  • 1/3 cup fresh lemon juice
  • ¼ tsp fresh ground black pepper
  • ½ – ¾ tsp red pepper flakes (depends on how spicy you want it)
  • 12 ounces of beer, at room temp.
  • 1½ cups AP flour
  • 3 Tbl melted butter
  • 4 eggs, separated
  • ¼ tsp. ground black pepper
  • ½ tsp salt
  • ¼ tsp paprika
  • 2 lbs. large shrimp, defrosted with tail on
  • ¾ cup grated Parmesan cheese
  • ¾ cup Dessicated Coconut
  • ¾ cup Panko
  • 3 cups canola oil
Instructions
  1. In a bowl, add the marmalade, ginger, garlic, lemon juice, red and black pepper; stir until well combined
  2. Cover the bowl and chill for at least several hours. The longer you wait, the more time your flavors will marry and become even more better.
  3. In another bowl, about 5qts, whisk the beer, flour, melted butter, egg yolks, salt, pepper and paprika into a smooth batter.
  4. Keep the egg whites as you’ll be using them later.
  5. Allow the batter to rest for one hour at room temperature.
  6. In a large bowl mix the Parmesan cheese, coconut and panko.
  7. In a medium-size bowl, beat the egg whites until stiff and nice peaks form.
  8. Fold the egg whites into the beer batter, until evenly incorporated. Do not whip or stir – fold them as you want the batter to be light and fluffy.
  9. Hold the shrimp by the tail and dip into the batter, coating thoroughly.
  10. Place the batter coated shrimp in the coconut mix and gently press the shrimp into the mixture, covering both sides.
  11. Place the coconut-battered shrimp to a large cookie sheet lined with plastic wrap or foil.
  12. Cover and refrigerate.
  13. Preheat oven to 250 degrees (you’ll be frying in stages so you’ll want to keep the shrimp warm).
  14. Using a 2-3 quart saucepan, heat the Canola oil until it registers 375° on a candy thermometer. If you don’t have a candy thermometer, drop in a spoonful of the batter mix to test the oil temperature. The batter should drop and then quickly bob back to the surface, turning golden in about 1 or 2 minutes.
  15. Using a metal slotted spoon, slide the shrimp into the hot oil – no more than 3-4 at at time. You don’t want to overcrowd the pot.
  16. Using your spoon, gently turn the shrimp around in the pot to fry until golden all over; ~2-4 minutes.
  17. Transfer to a rack lined with paper towels to drain.
  18. Once drained move them to a tray in the warmed oven.
  19. Serve with the dipping sauce.

Just some tricks of the trade – Cake baking

Don’t you hate it when you see an amazing picture of a cake, follow the recipe to the letter only to have it not turn out anywhere near like what you hoped it would be?!  Trust me, I have felt your pain. It’s not rocket science to making a great tasting cake – flour, eggs, butter, leavening(s) and some type of flavor (vanilla/chocolate/cocoa…etc).  How much you put in of each as well as the order defines the taste and texture of the cake.  S’not really hard but man it’s sooooooooooooo frustrating when you put that time and love into making a cake only to have the center sink/top crack, sides burned-inside raw, humps in the middle.. I could go on and on.

Well I’ve learned some tricks along the way over the years and decided to put a few down for you to hopefully help you out next time you bake a cake.

Lighter/Fluffier cakes:

  • Add 1-2 Tbl of meringue powder to your cake mix. This will help it rise higher and make it lighter in texture.
  • Do the tops of your cake split or crack?  Add 1 envelope of Knox unflavored gelatin to the cake batter.
  • Cake straps.. BEST THING EVER INVENTED for baking.  You can buy them on Amazon or make your own using wet papertowels, tin foil and a paperclip – just wet the paper towels, fold like a bandana and wrap it around your cake pan.  Keep it closed with a pin or paperclip (anything metal).
  • Give at least 5 minutes to creaming the butter. You want to get lots of air into the butter. Add the sugar and beat/cream really well again.
  • Separate eggs before adding them to recipes–beat yolks till golden and creamy then add to the butter/sugar mixture. Beat the egg whites until light and frothy before folding them into the butter mixture.

Moister cake:

  • Chocolate Cake: Before adding the baking soda to your cake recipe, mix it with a teaspoon of vinegar.
  • Fruit Cakes/Dense Cakes: Keep a pan full of water in the oven when baking the cake (replace water if needed to keep it topped up).
  • Substitute oil in the recipe for unsweetened applesauce or plain yogurt. If the recipe calls for 1 cup oil, use 1/2 cup oil and 1/2 cup applesauce.

Sifting:

  • Measure all ingredients to exact amounts first, then sift.

Grease & Flour Pans:

  • Use a paper cupcake holder, a paper towel, a piece of wax paper, the butter wrapper paper or a plastic baggy to grease the pans without messing up your hands. You could also use a pastry brush.
  • Try dusting the cake pans with a bit of the dry cake mix or cocoa (for chocolate cake) instead of flour.

Cake Pan Grease:

  • Don’t buy the spray stuff or grease it then add flour to it only to get flour EVERYWHERE!  Follow this tip to make your own!  Same can be done with cocoa in lieu of flour for chocolate cakes.

Angel Food Cake

  • When the cake has finished baking, take it directly from the oven and place it upside down either on the legs (if your pan has legs) or on the neck of a bottle. This will help prevent the angel food cake from falling as it cools. After 30 minutes, you can turn it over then remove from pan once cooled.

Frosting & Icing Tips:

  • Don’t attempt to ice the cake until it’s completely cool. Dust the cake lightly with a pastry brush before frosting, helps reduce crumbs in the icing.
  • First ice the cake with a thin layer of frosting, then refrigerate (covered). This is called “Crumb Coating”. After an hour you can do a complete frosting job. This helps keep the crumbs at bay and your outer frosting layer should be crumb free.
  • After frosting the cake, you can use a hair dryer to slightly melt the frosting. This will give the frosting a smooth, glossy look. If you prefer you can use a metal icing spatula or knife first heated by sitting in hot water, wipe dry, then use the heated knife to smooth the icing.
  • Have a bag of chocolate chips on hand? Just sit the whole bag in a bowl of very hot water, and mush the bag up every couple of minutes until all the chocolate has melted and there are no lumps. Snip the corner of the bag and squeeze out the melted chocolate directly onto the cake.
  • To help prevent a flaking or cracking frosting, add a pinch of baking soda when mixing the frosting.
  • If icing is a bit too thin or runny, lightly dust the top of the cake with flour then spread the icing on top. This will help the icing hold to the cake.
  • Quick Tip: Icing Cakes: For one layer cakes, turn the cake upside down before icing so that the top is perfectly flat and even. When icing two cake rounds or squares, place a layer of frosting on the top of one round, then place the other round upside down on top for a perfectly flat top.

Cutting Cake Tips:

  • Heat a knife first before cutting a cake for crumble-free slices. To heat the knife, you can run the knife under very hot water then wipe dry with a clean towel.
  • Use unwaxed dental floss to slice through the cake (great for the gooey or sticky cakes).
  • If you don’t have unwaxed/unflavored floss you can use fishing line (clean, please!) :)

Time for comfort food – Zucchini Lasagna

Hey all – what’s shakin? What a great weekend I had… er um, am having!  With daylight saving’s time in full swing and the days being brighter, longer it’s as if the body gets this burst of energy.  You feel replenish and energized!

We were having family stop up Saturday night so I made dinner for us – Pollo pomodoro con peperoni e spinaci ( which my sister, niece and her bf loved),  Yuengling Bacon Cheddar Chive muffins, Angel food cake and ‘Hostess’ cupcakes.  The food was awesome (or so I’m told) but I wasn’t too keen on the outcome of the cupcakes.  The filling didn’t set so while it tasted awesome it still was too thin for my liking.  I know what I did wrong which is good so I’ll definitely give it another shot.

Our friends stopped over too and we had game night with them.  Have you guys ever played the card game “Golf“?  Totally fun and honestly about the ONLY way I will ever play anything named golf!  I just do not have the patience or attention span to play the real game.  I would be that one wandering around on the green in the golf course in the cart :)   We also played ‘Phase 10′ .  Our BFF’s introduced us into the game and totally love it!  Definitely check it out.  Since I knew they were coming earlier I had whipped up a batch of pizza dough and set it in the bucket to rise as I knew, even though I was making a big dinner, we would want snacks later.  Trust me, if you ever visited me, you would NEVER EVER starve!  The pizza was a huge hit.

Today, I was a true lazy butt.  Yep… got up at 6am, brushed my teeth and crawled back in bed until… you ready for this?  2pm!  Yep.. 2pm!  I didn’t go back to sleep, instead I laid in bed watching movies and musicals. I mean I honestly did NOTHING and it was AWESOME!!!

AWESOME I TELL YA!

Since Mr. Fantabulous’ birthday is coming up this week, we went out for lunch at a quasi-local American-Mexican place. Now we’re home with full bellies, he’s off napping and I’m going through my orders for this week.

It’s been a while since I’ve posted some recipes so I am sorry.  Just work (my real job) has been SUPER busy and it’s left me with no free time.  But I’ve realigned my schedule to give you guys more ‘TKW’ attention :)

So for today, since it’s cooler weather again, I’m going comfort food for you.  I’m mixing it up a bit and making it healthier.  Even Mr. Fantabulous who HAAAAAAAAAAAATES zucchini really likes this!  I’m talking Zucchini Lasagna.


Time for comfort food – Zucchini Lasagna
Print
Author: The Kitchen Whisperer
Find more fantabulous recipes, tips and tricks at www.thekitchenwhisperer.net. Also, join our TKW Family on Facebook
Ingredients
  • 3 Large Zucchinis
  • 2 Packages Frozen Chopped Spinach, defrosted and drained
  • 1 jar marinara sauce
  • 1 cup roasted red peppers, chopped
  • 1 cup baby portabella mushrooms, sliced
  • 15oz Ricotta Cheese
  • 4 Tbl Extra Virgin Olive Oil
  • 2 Garlic Cloves, chopped
  • 2 large eggs
  • 2 cups Mozzarella Cheese, Shredded
  • ½ cup Mozzarella Cheese, Shredded (reserved for end)
  • ½ cup Parmesan Cheese
  • 2 Tbl parsley Flakes
  • Salt and Pepper
Instructions
  1. Preheat oven to 325 degrees
  2. Peel zucchinis and slice into thin strips – this is where a mandolin comes in super handy. If you don’t have one, use a cheese slicer.
  3. Lay flat on foil-lined baking sheets.
  4. Brush each side of sliced veggie with 3 Tbl olive and top with salt and pepper.
  5. Bake for 20 minutes until slightly crispy
  6. In large sauce pan sauté the red peppers and mushrooms in the remaining olive oil for about a minute.
  7. Add the garlic and sauté until slightly golden; about a minute.
  8. Add the sauce, cover and simmer for 15 minutes
  9. Spray large lasagna pan with olive oil spray
  10. Mix ricotta cheese, eggs (slightly beaten), ½ cup mozzarella cheese, ¼ cup parmesan cheese and parsley in a bowl. Set aside.
  11. Spread 1/2 cup sauce on bottom of lasagna pan.
  12. Layer enough strips of zucchini to line the bottom of the pan.
  13. Next add a thin layer of spinach followed by the ricotta cheese mixture, ¼ cup mozzarella cheese and sauce – evenly distributing enough so you can have enough of the fillings for each layer.
  14. Repeat layers with remaining ingredients. Top with Parmesan cheese.
  15. Cover with foil and bake for about 35 minutes.
  16. Remove foil and sprinkle on reserved ½ cup of mozzarella cheese.
  17. Increase temperature to 350.
  18. Bake for 15-25 minutes or when a knife is inserted that the zucchini is soft.
  19. Let cool 15 minutes before eating.

Cutest things EVER! Baked Lasagna cups

So while I first and foremost believe the true taste to food is that it MUST taste good a strong second is that it MUST be visually appetizing.  Let’s face it, we eat with our eyes first.  If it doesn’t look good “ain’t no way it’s going anywhere near my mouth!” as she makes the 3 year old squinchy lipped face.

With that being said, it seems that summer dare  I say has come early here in Pittsburgh as the past few days it’s been in the 70′s and 80′s!  So that means swimsuit season.  Wait, swimsuit?  ME?! In a swimsuit?!

One second please…

BAHAHAHAHAHAHAHAHAHAHAHAHAHAHAHAHAHAHAHAHAHAHA!!!

Yeah um no.. I’ll stick with capri’s and t-shirts thank-you-very-much!.

*sigh* okay.. I’ll succumb to it which means cutting back not eating this or that and living on wheat grains, rice and tofu…

Can you hold one more second please?

BAHAHAHAHAHAHAHAHAHAHAHAHAHAHAHAHAHAHAHAHAHAHA!!!

Um yeah, no.. not gonna happen!  I love food WAYYYYYYYYYYYYYYYY too much.  So for me it’ll be better portion control.  You still can eat the foods you like with moderation.  So with that being said, I LOOOOOOOOOOVE my lasagna.  I mean LOOOOOOOOOOOOOOVE my lasagna.

‘…thinks to herself’ “Smaller portions… lasagna…Italian husband… smaller portions… never gonna happen!  But there has to be a way!  Hmmm.. lasagna is supposed to be big and thick and gooey and hefty.  Hmmm..(makes the thinking face where the brow is raised, lips are pursed and eyes are staring off into lala land).”

THEN it dawned on me!  If I make them absolutely adorable and visually appealing then it may work!  I could still eat my lasagna BUT with a better portion control (not that I ate huge amounts of it anyway but still.. tis bathing suit season <insert hysterical cries of laughter and terror here>.  I had seen mini type entrees before so the premise isn’t new but my adaption of it is (at least for me).

What I love about these is that they are great warm or straight out of the oven.  These are PERFECT for parties and gatherings too!


note:  photo is courtesy of Kevin & Amanda


Cutest things EVER!
5.0 from 1 reviews
Print
Author: The Kitchen Whisperer
Find more fantabulous recipes, tips and tricks at www.thekitchenwhisperer.net. Also, join our TKW Family on Facebook
Ingredients
  • 2 cups Marinara Sauce
  • 1 1/2 cups part skim ricotta cheese
  • 1 egg
  • 1 tbl fresh chopped parsley
  • 1/2 tsp kosher salt
  • 1/2 tsp fresh ground pepper
  • 1/4 cup grated Parmesan
  • 1 cup shredded mozzarella
  • 24 small square wonton wrappers
  • 1 1/2 cups shredded mozzarella cheese
  • 1/4 cup grated Parmesan
Instructions
  1. Preheat oven to 375ºF.
  2. In a large bowl combine the ricotta, salt, pepper, parsley, ¼ cup parmesan and 1 cup mozzarella.
  3. Coat a 12-cup muffin tin with nonstick cooking spray.
  4. Place 1 wonton wrapper into each of the 12 cups, pressing firmly in the bottom of the cup and up the sides.
  5. Using half of the ricotta mixture, divide it among the 12 muffin cups.
  6. Next, using half of the marina, spoon it evenly ricotta cups.
  7. Sprinkle each with about 2 tsp of mozzarella.
  8. Gently press another wonton wrapper on top of the mozzarella layer.
  9. Repeat the process by distributing the remaining ricotta, then the remaining tomato sauce, and finally the rest of the shredded mozzarella.
  10. Sprinkle the rest of the grated parmesan on top.
  11. Bake for 10 minutes, or until the cheese has melted.
  12. Allow the cups to cool before removing from the pan.
  13. *Additions: You could easily use a meat sauce with this or make it pizza style subbing out the marinara for pizza sauce, using all mozzarella/provolone for the ricotta mixture and adding pepperoni.

Follow us
Categories
Top Posts & Pages
Tweets