Posts may contain affiliate links that help enable me to continue to provide you with free recipes. As an Amazon Associate, I earn from qualifying purchases. Please see my Privacy Policy for further details.
Have I told you all lately just how much I adore carbs? Like I LOOOOOOOOOOOVE bread and I’m saddened to say this but my thighs love it even more *damn it!*. LOL Bread is my downfall needless to say.

Not chocolate, not cake, not cookies but give me a piece of fresh warmed buttered bread and I’ll follow you home like a little stray cat purring like I’m your bestie for life.
So when I decided to make these onion brioche buns I wanted to really go over the top with them.
These I made were bigger than your normal-sized buns as I needed ‘Gunther Sized’ buns as the boys were over the house doing manly construction work.

Let’s just say these buns lasted for 1 meal and that was it! They INHALED these like it was their job!

Brioche Onion Hamburger Buns
Find more fantabulous recipes, tips and tricks at www.thekitchenwhisperer.net. Also, join our TKW Family on Facebook

Ingredients
- 2/3 cup / 163.41 grams warm whole milk
- 1/3 cup / 78.9 grams warm water
- 3 tablespoons / 63 grams of honey
- 2 Xl eggs, room temp.
- 2 1/4 teaspoons / 7 grams instant dry yeast
- 3 cups / 360 grams of bread flour (plus more, if needed)
- 1 1/2 teaspoons / 9 grams of sea salt
- 4 tablespoons / 56.7 grams unsalted butter, softened and cut into cubes
- 1/2–3/4 cup / 72-108 grams dried minced onions
- 1 egg yolk with 1 teaspoon water, beaten
- sesame seeds *optional
Instructions
- In the bowl of a mixer fitted with the dough hook, add the flour, salt, and dried onions. Using a whisk, gently combine. Add in the butter, eggs, honey, milk, water, and yeast. Mix on low scraping the sides of the bowl to incorporate all the flour.
- Increase the speed to medium and knead for 8 minutes…the dough should be tacky and look pretty sticky. You can add a tablespoon of flour or so if you feel it’s too sticky (some dough will just barely stick to the sides of the bowl). Don’t add too much flour as the dough should be tacky and look almost wet. It’s a very soft dough.
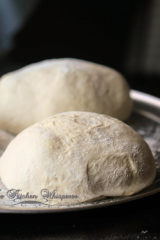
- Continue kneading for an additional 2 more minutes (10 minutes total – this is important!) The dough will ‘climb up the dough hook’. That’s OK. Scrape the sticky dough that clings to the sides of the mixer bowl and then form all of the dough in a ball. Lightly butter a bowl and put the dough in that. Cover the bowl with plastic wrap and let rise in a warm place until at least doubled in bulk and is nice and puffy about 1 to 2 hours.
- Place the puffed dough gently onto a floured countertop. Lightly sprinkle a bit of flour on top as well. Using a dough scraper, divide the dough into 12 equal pieces (mine were about the size of a lemon). These really puff up! Flour your hands and form the pieces into balls and place them on a lightly oiled parchment-lined baking sheet. Arrange 2 to 3 inches apart on the baking sheet as they will rise some more. *You can also place them in a prepared larger muffin or hamburger bun pan for more uniform, puffier tops. Flatten the balls down a bit ( to about 1 1/2-2”). Lightly spray the dough balls and cover loosely. Let buns rise in a warm place for 1 to 2 hours or until puffed again.
- minutes before ready to bake, preheat the oven to 400F with rack in center.
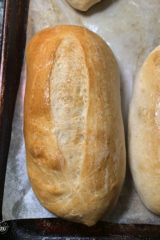
- Light brush each bun with egg yolk mixture and top with sesame seeds. Bake, turning sheet halfway through baking until tops are golden brown, about 10-15 minutes.
- Transfer to a rack to cool completely and freeze, if desired.


Thanks for this recipe. It was easy and the results were delicious. My rolls were nowhere near the thickness of yours though. How did you get that beautiful height in?
Hi Anne!
When I flatted them down, I didn’t push too much. OR you can bake them in a prepared larger muffin or hamburger bun pan.
Best Kitchen Wishes!
I have made these 3 times but use 1 Tablespoon granulated onion powder and form them into 8 flattened rolls! Best Recipe Ever!!! I will never buy Hamburger buns again! Every one Raves about these rolls!!
Made these today and They Are Fantastic! I used regular flour and added a 1/4 cup more well into the kneading, I also only had onion powder and used 2 tablespoons but worked well! Thank you for sharing this wonderful recipe!! Its a ten!
The brioche looks like they were bake in a muffin pan? Can I bake them in a muffin pan?
Hi Jackie
Actually they were baked in a commercial ‘bun’ pan. It’s made for buns. Conventional muffin pans are too small.
What I’m going to do is re-shoot the pics and show them baked on a sheet pan.
Best Kitchen Wishes!
Did you re-shoot on a sheet pan?
Not yet, it’s on my to-do list. Do you need help with something?
Best Kitchen Wishes!
Excellent recipe, passed these to 3 families & they were gone the same day! So light & FULL of flavor. We topped with lightly carmelized onions before baking! AMAZING!!!
Thank you so much!!!
Best Kitchen Wishes!
I have got to make these but can I make the dough in a bread machine?
Hi Beth!
I think it would but honestly I haven’t used a bread machine in decades.
Best Kitchen Wishes!
Do you use instant yeast, the kind that doesn’t have to be mixed with warm water, or active dry yeast and don’t bloom it but just put it in? These look so yummy!
Hi Patty!
I use Instant yeast – specifically Red Star Platinum yeast.,you really don’t have to bloom it though I’m a creature of habit and let it bloom for a few minutes.
Best Kitchen Wishes!
I just baked 12 of these rolls using Caputo 00 Chefs Flour. The result was excellent but the dough was very wet and very difficult to handle after the eggs were added. I persevered and enjoyed the flavor, crust and crumb of the rolls, which required 15 minutes in the oven. I will try using at least 1/4 to 1/2 cup more flour for the next batch to
produce a more manageable dough.
Thanks for posting this recipe!
Hi! I’m so happy you’ll love it! Yes the dough will be wet and pretty much hard to hold shape. This is a slack stage. Slack, if you’re unfamiliar, is where the dough is wet (but not liquidy) and won’t hold a shape. But great thinking on your feet to add a bit more flour.
Best Kitchen Wishes!
Are you able to freeze/and or leave the uncooked dough for a few days before baking?
Thank you!!
Hi Becky,
Yes but…
In the fridge if you cover it tightly it’ll last about 2-3 days. If you know you are going to freeze the dough, add about 1/4 teaspoon more yeast to make up for any that may die off in the freezer. Most bakers prefer to bake all of the dough and freeze the baked loaves for later. Any type of enriched dough like brioche or challah tends to lose its full rise when you freeze it.
Best Kitchen Wishes!