Making homemade crusty French baguettes are easier than you think. Nothing beats the smell of warm bread filling up the kitchen! Make this delicious recipe today!
So I had been craving some crusty French bread for a while. Well, that’s not entirely true. What I was really craving were herbed dipping oil and crusty bread. I had made the herbed dipping out but had no bread. Well, that is, no bread that was best suited for the oil. Therefore I had to make bread.

Now I know some of you are probably thinking “Go to the store woman and buy some!” Um no… I prefer to control the ingredients I put in my bread and honestly my bread ROCKS!
You can keep your grocery store, specialty chain bread stores (that arrive frozen and aren’t made from scratch on-site btw!). I want MY bread! And once you make this, you’ll only want THIS bread again!
Easy to Make But Plan Ahead
Now, this bread is fairly easy but you do need to plan for it as it will be an all-day thing.
No, you won’t be with the bread all day working on it but rather you’ll have to let it rise, fold it, rise again and repeat a few more times.
So the night before you want to eat this, you’ll have to start the recipe as you need to create the sponge.

What’s a Sponge?
“So what’s a sponge? Why’s it important anyway? Aren’t those the things you use to wash your car or dishes with? ”
A sponge is a wet batter that has yeast added to it. The yeast creates bubbles in the moist batter and makes the batter, well, sponge-like.
The sponge method is used for 3 different reasons:
- Taste
- Texture
- Chemistry.
The flavor that is created is dependent on the ingredients used and the fermenting yeast. Just like sourdough, the longer the ferment, the greater the taste difference.
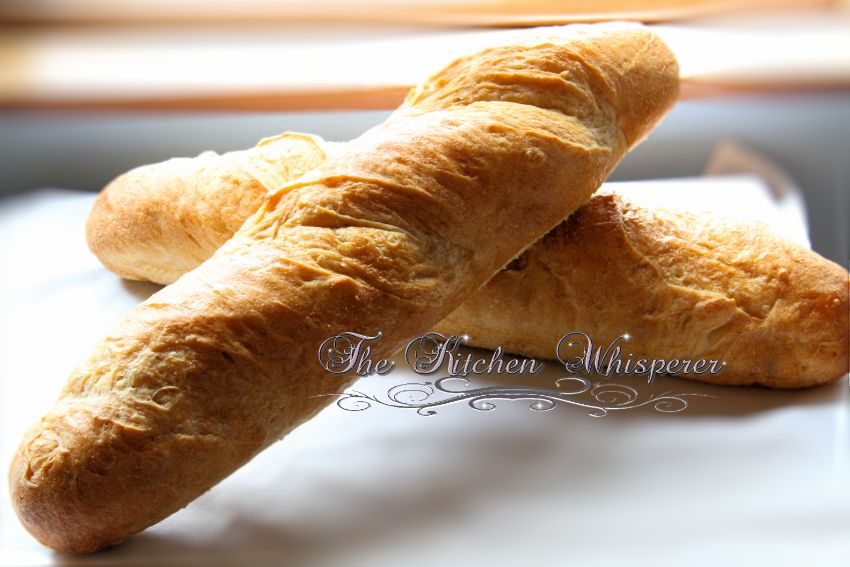
Even though this dough took a full day (well okay I’m not counting the night prior to let the sponge ferment), it was well worth it! The bread was crusty on the outside and chewy on the inside.
It was absolutely PERFECT for the dipping oil…
… and the butter I had on it later
… and the crostinis I made later
… and what leftovers I had, I made awesome herbed croutons.

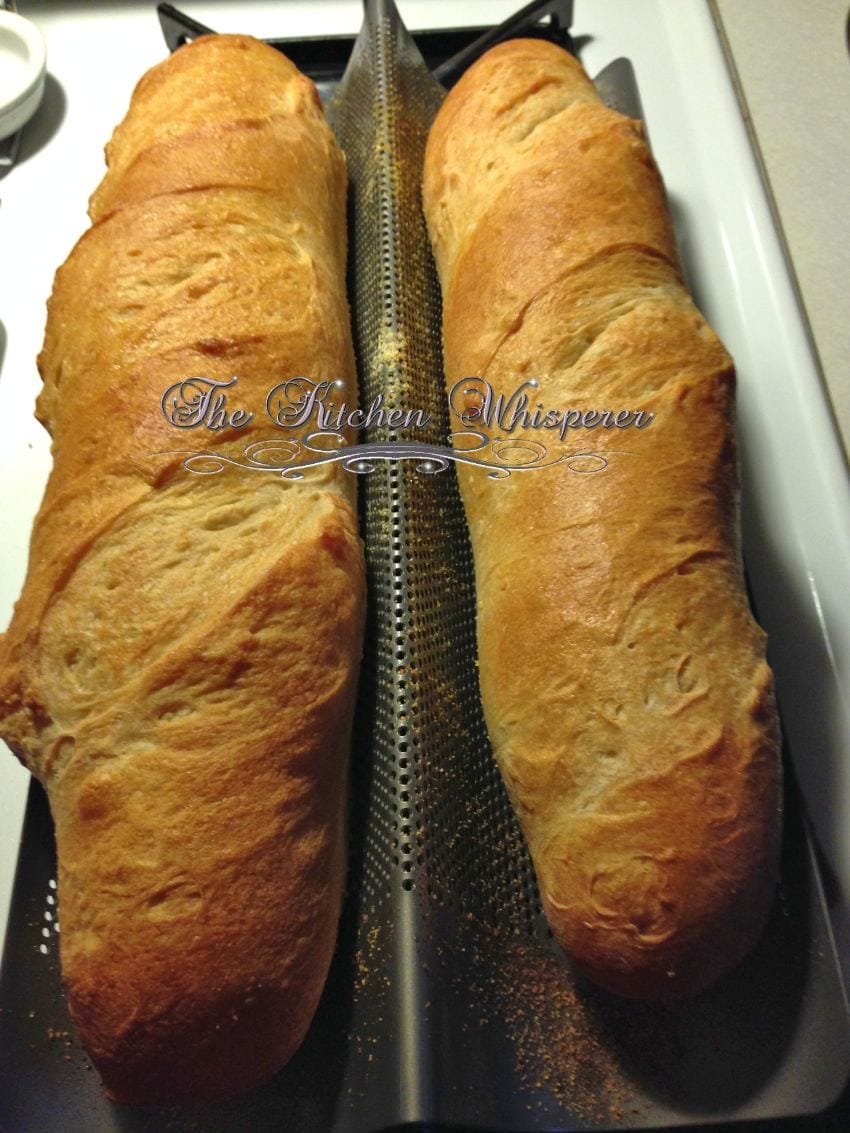
As you can see below I use a 2-Section Non-Perforated Non-Stick French Baguette Bread Pan.
If you want seriously crusty bread, GET THIS PAN! I use this for baguettes as well as Italian Bread. Now this one makes 2 ‘fatter’ baguettes or Italian loaves. If you want the thinner style baguettes, then use this pan: 3-section Non-Perforated Non-Stick Baguette Pan.
If you’re like me, the first time I bought this pan I was really, really nervous about using it as well it has holes. I was afraid that the dough would 1 – stick and 2 – seep through the holes and do bad things to the inside of my oven.
I can tell you that with this recipe, it doesn’t stick nor seep through. All you have to do is spray it lightly with baking spray and then sprinkle on some cornmeal.
Crusty French Baguettes
Making homemade crusty French baguettes are easier than you think. Nothing beats the smell of warm bread filling up the kitchen! Make this delicious recipe today!
Ingredients
Sponge
- 1/2 cup bread flour
- 1/2 cup warm water
- 1/2 teaspoon yeast
Dough
- 3 – 3 1/2 cups bread flour
- 1 teaspoon yeast
- 1 1/2 cups warm water
- 1 1/2 teaspoon salt
Glaze
- 1 large egg beaten with 2 tablespoon water
Instructions
Make the Sponge
- Stir all of the ingredients together in a medium bowl until combined. Cover with plastic wrap and let sit at room temperature for at least 8 hours but no more than 24 hours. Essentially the sponge will rise and fall some.
Make the Dough
- The next day, make the dough by combining 3 cups flour and the yeast in a Stand Mixer fitted with the dough hook.
- With the mixer on low speed, add the water and mix until the dough comes together ~ 2 minutes.
- Stop the mixer, cover the bowl with plastic wrap. Just wrap the plastic wrap around the top of the bowl with the dough hook in it. Don’t bother removing it.
Mix it all together
- Let the covered bowl sit at room temperature for 20 minutes. After 20 minutes, remove the plastic wrap, add the sponge and salt, and knead the dough on medium-low speed until it is smooth and elastic ~ 8 minutes. If after 4 minutes the dough seems a bit too wet, add the remaining 1/2 cup flour, 2 tablespoon at a time, until the dough clears the sides of the bowl, but sticks to the bottom.
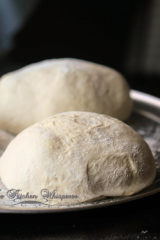
- Lightly oil a large bowl, set aside. Sprinkle some flour on your counter and turn the dough out on to it. Gently knead by hand to form a smooth, round ball. Place the dough in the bowl and cover tightly with greased plastic wrap. Let rise in a warm place until doubled in size, ~60-90 minutes. Turn the dough in the bowl with a Dough Scraper. Essentially you’re folding the dough on top of itself. Cover, let rise for 30 more minutes, then repeat the turning process. Cover and let rise until the dough has doubled in size, about 30 minutes longer.
- Sprinkle some flour on your counter and gently scrape the dough out of your bowl on the floured counter. Using a Bench Cutter, divide the dough in half. Gently pat each piece of dough into an 8 by 6″ rectangle with the 8″ side towards you.
- Fold the bottom third of the dough up towards the center and press gently to seal. Take the top third of the dough and fold that overtop the center gently pressing down to seal. Lightly flour the side of your hand and create a large crease length-wise down the center of the dough. Starting at one end of the dough, grab the outside of the dough (on either side of the crease), pull up to the top, and pinch to secure. Repeat this for the entire length of the dough. Gently roll and set aside. Repeat the above folding, crease indention, and pinching steps for the other dough ball.
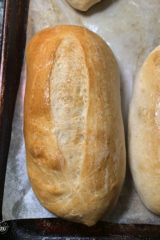
- Spray the Baguette Pan with cooking spray and sprinkle with cornmeal. Place both baguettes in the pan. Mist the baguettes with vegetable oil spray, cover loosely with plastic wrap, and let rise in a warm place until nearly doubled in size and the dough barely springs back when poked with a knuckle, ~ 1 to 1 1/2 hours.
- Meanwhile, adjust an oven rack to the lower third position, heat the oven to 500F. Place an empty metal pan on the bottom of the oven. Score the top of the bread with a sharp knife, cutting three-four 1/2″ deep slashes along the width of each baguette. Brush the bread with the glaze, then spray lightly with water. Place the baguette pan on the rack and immediately pour 1 cup of VERY hot water into the pan on the bottom of the oven. Shut the door fast and IMMEDIATELY reduce the oven temperature to 425F and bake until the crust is deep golden brown and the center of the bread registers 210 degrees on an instant-read thermometer, about 25 minutes, rotating the loaves halfway through baking.
- Transfer the bread to a wire rack and let cool for about 30 minutes before serving.
Notes
Things you need: Stand Mixer Dough Scraper
Bench Cutter 2 Section Baguette Pan or
3 Section Baguette Pan


I would love to try this recipe but I don’t have a sectioned bread pan. Is there any way I can work around it or create a makeshift one myself? Thanks.
Hi!
My friends over at The Kitchn note how to make baguettes without a pan “Make a couche (optional): If you do not have a baguette pan or couche, tear a piece of parchment paper that is 3 times the width of a rimmed baking sheet. Crinkle the paper, then flatten and fold into thirds lengthwise. Line the baking sheet with the parchment, ensuring that the folds peak up, creating 3 valleys for the shaped baguettes to rest in. (If you have a baguette pan or couche, skip this step.)”
Source: https://www.thekitchn.com/how-to-make-a-french-baguette-at-home-236641
Best Kitchen Wishes!
Was visiting out of town and a neighbor asked me to bake some bread for her using her new baguette pan. Hubby couldn’t find my French bread recipe so I searched for one. Came across your recipe. One of the best breads I ever made/ate. The neighbor and her daughter ate a whole loaf that evening. Was very hard to keep my hands off too. This is now my go-to French bread/baguette recipe. Thanks for sharing.
This recipe is absolutely fool-proof. The baguettes turned out perfectly crusty with a soft spongey inside. My step dad loves baguettes and is really picky when it comes to where he gets them from. Now he requests I make these allllll the time.
I absolutely love this recipe! Works perfectly every time. It also make a wonderful loaf for toasting. One question, though – your last paragraph mentions removing the parchment, but I can’t see in the instructions where it is used?
Thank you so much Meg! It was a typo. I’ve updated it. So happy you love the recipe!!!
Best Kitchen Wishes!
Just made my first two baguettes ever! We have eaten the first one for lunch – delicious. Well worth the long winded method! I’ll be making them again for sure.
Were you intentionally trying to be rude with your “long winded” comment?
I believe what you were meaning to say were “thorough method”. I love that Lori takes the time to clearly explain things and make them idiot-proof.
She writes like an Engineer (because she is also one) which is detailed.
I’ve made these countless times Lori and they are amazing!
Best French bread ever!
I have made these baguettes and I was really pleased with the results. I just love baking/ cooking an although I live in a country where they bake and sell the best baguettes/bread in the world, France I still love making my own stuff. I bought a baguette baking tray today, they just sell them in the supermarket so have made a sponge to rest overnight and shall have another try with French flour & yeast as apposed to the English bread flour & yeast I bought back from the UK. So looking forward to seeing if their is much of a difference.
Hi, I made this and it came out great! Thanks for the instructions, I am a new baker. Was slightly panicky when my dough was still very sticky but I got through it. Bred tasted great!! Made pork belly bahn mis and must say, I was pretty impressed with myself. My only slight issue is that the crust was pretty light colored. I did also have a question on the type of yeast. I did regular (not instant) but was not entirely sure if this was correct
Hi Asha!
Thank you so much! Yes the yeast will make the difference. So a light colored crust can be handled 2 ways… bake slightly longer as it should be baked til golden brown and the internal temp.
You can also brush the dough with milk or cream lightly before you bake it.
Best Kitchen Wishes!
I baked this bread yesterday . I shaped mine has a big round country loaf. This bread seems a lot of work because of the many proofing steps, but let me assure you that this is a no effort amazing unbelievable bread . I have a bread machine that I use quite often to make healthy bread but I wanted just an artisan white bread to go with my paella . I sprinkled my loaf with flour than baked it at 425 for 18 minutes than lower my oven at 385 for another 10 minutes . When I took a reading with my thermometer it was at around 200 degre than about 2 hours later when I served it it wasn’t crusty . It seems when I bake bread the crust won’t stay hard . My question is how do you bake your bread to stay crusty ? Nevertheless it’s an amazing texture !
Thank you so much Brigitte!
The secret to getting the bread crusty is the steam you build up in the oven. This is why you add the hot water to the pan in the oven and immediately shut the door. That is what forms the crust. When you leave it stand out, after it’s done baking, it should firm up even more. You didn’t cover it as it was on the counter, right?
Best Kitchen Wishes!
So last night I came across this recipe for crusty baguettes…I have been experimenting lately and have become obsessed with my quest to make a crusty good baguette. Your recipe looked complicated but I was willing to try! I made my sponge just before I went to bed. When I got up I started doing each step of your recipe. I am now a believer!!! My baguettes were so crunchy and good!!!! Thank you!!! I’m going to see what else you have on your website and tell all my friends! What a fun recipe!!!!
Thank you so much Rhonda! I’m so happy that you loved this and that you believed enough and trusted in me to make this recipe!
Best Kitchen Wishes!