Posts may contain affiliate links that help enable me to continue to provide you with free recipes. As an Amazon Associate, I earn from qualifying purchases. Please see my Privacy Policy for further details.
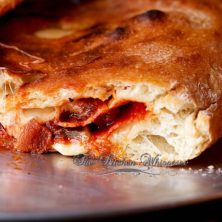
PIzzeria style hand-tossed pizza dough that you can make right at home. No special pizza oven needed either!
Having a pizzeria in our family for a couple of decades, you become “known” for your amazing pizzas and dough.

Any successful pizzeria, you’ll always get the begging requests for your dough recipe. It’s very flattering but if they gave out their pizzeria dough recipe then why would someone patron them when they can make it at home?
Pizza dough pretty much all contains the same ingredients – flour, water, oil, yeast, salt. However, it’s the amounts and types of stuff you put in that separate your dough from a cardboard 99cents pizza to an OMG-I-WANNA-MAKE-BABIES-WITH-YOU-PIZZA!

I created this hand-tossed NY-style dough that is easy to make and crazy easy.
Plus you’ll be able to make pizzeria-style pizza at home.
It comes together beautifully, has a great texture, and chew to it. It crisps up beautifully while leaving the crust interior soft and chewy. THAT makes, for me, the perfect pizza.

This is a simple basic pizza dough that rivals most others. Now you can easily mix it up by adding seasonings to it – maybe some garlic powder, oregano, red pepper flakes, or even some ground Parmesan.
Make it your own! You really can’t go wrong with this dough. It’s foolproof and makes amazing pizza.

The trick to this dough is to not over-knead it or add in more flour than necessary.
Often I’ll see folks stretch it out with a ton of flour. The pizza ends up coming out white on the edges (because of the excessive flour) or tough/dry.
The dough should be tacky but not stick to your fingers.
Same day vs Cold Ferment Dough
I am a huge fan of cold-ferment dough. I always do this and can count on one hand the times I’ve made same-day dough. Does same-day dough work? Absolutely!
The difference – taste and texture.
The slow cold rise will help build the flavors. When you chill your dough in the fridge, you’re cold-fermenting/retarding your dough to help slow down the activity of the yeast. The cooler temps help the dough produce a better flavor and produce carbon dioxide slower. This means your dough won’t proof up like a balloon too fast.

Freezing Dough and Thawing Instructions
- After the dough rests for the first 30 minutes and you form them into 2 separate balls, place them on a light floured rimmed baking sheet, and stick them into the freezer uncovered.
- Once they are frozen to the point they are firm, remove them from the freezer, double wrap each one tightly in plastic wrap and place into a freezer-safe bag. This will last for up to 3 months.
- When you’re ready to use it, take one (or both) out of the freezer the night before using it and let them thaw in the fridge. Lightly spray the dough with cooking spray and cover with plastic wrap (make sure no air hits them.).
- A few hours before baking, remove them from the fridge, place them in 1 or 2 bowls lightly sprayed, cover with plastic wrap and allow to rise again. They may not fully double in size but they will puff up considerably.
- Once they are puffed up, simply stretch and bake as normal.
Simple Hand Tossed Pizza Dough Recipe
- Prep Time: 15
- Cook Time: 15
- Total Time: ~30 minutes not including proofing
- Category: Baking
- Method: MIxer
- Cuisine: Pizza
Pizzeria-style hand-tossed pizza dough that you can make right at home. No special pizza oven is needed either!

Ingredients
- 1 packet platinum instant yeast (2 1/4 teaspoon or 1/3 of a 2-ounce block (so .66 ounces of cake yeast)
- ~304 grams of water or 1 1/4 cups * if using same day use warm water(105-115 degrees F/40-46 degrees C). If fermenting overnight in the fridge use cold water. This will give you 64% hydration. You can go up to 350 grams of water if you want higher hydration (if you’re using a strong 00 flour)
- 10 grams or 2 1/4 teaspoon olive oil
- ~475 grams or 3 – 3 1/2 cups 00 Pizza flour or any high-gluten bread flour, plus extra as needed
- 8 grams (1.4 teaspoons) of sea salt
Instructions
- If using Active Dry yeast, you need to proof it first. Proof the yeast by pouring the yeast into the water in a bowl of your stand mixer and gently stir until the yeast dissolves. *Cake yeast you make have to break up with your fingers. If using Instant Yeast, you do not need to proof it. Just add the water and yeast to the bowl and skip to step 3.
- Let the yeast and water stand until foamy, about 5 minutes*. If using cold water, just mix and move to the next step as the yeast won’t quite bloom with cold water.
- Once the yeast has bloomed (if you’re using cake or active dry yeast), add in the flour and fit your mixer with a dough hook. Mix on low just until loosely combined. Add in the salt while the mixer is running stopping if need be to scrape down the sides. After 3 minutes of mixing, drizzle in the oil.
- Mix until a soft, smooth elastic ball form; ~8-10 minutes. The dough should pull away from the sides of the bowl but still be wet/tacky to the touch. If need be add a tablespoon of flour or so to help combine. If it’s too dry, you may need to add a few tablespoon of water. Remove the dough from the bowl and place it on a very lightly floured surface. Give it a few kneads to form the dough into a smooth ball tucking the ‘ends’ underneath.
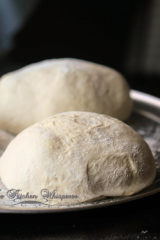
- Allow the dough to rest, covered for 30 minutes. After 30 minutes, using very lightly floured hands, knead the dough gently by hand just to smooth it out and divide into smaller portions. If using the same day, divide the dough in half, shape as balls, and put in 2 separate bowls (covered) and allow to rise until doubled in size; about 60-90 minutes. *If you’re placing in the fridge, divide into 2 equal-sized balls, and place in 2 bowls covered with plastic wrap (just be sure it has enough room to rise) and refrigerate (covered) between 48-72 hours. The slow cold rise will help build the flavors. *My personal favorite
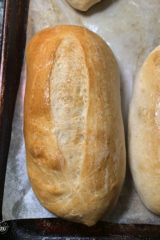
- Place one rack on the lower third of your oven. On that place a pizza stone. It’s recommended you use 2 when you bake pizza. Place another rack on the upper ledge and place the 2nd pizza stone there. When ready to use, preheat the oven to 550F. If you’ve had the dough in the fridge, bring out to room temperature at least an hour prior to baking. If you use a pizza stone, follow the manufacturer’s instructions on heating that up.
- Stretch out your dough on a very lightly floured surface (trying not to work it too much as you want the ‘gas’ left it in – that’s what causes the bubbles and crispy airiness of the dough).
- Place the dough in a pizza pan, directly on a Pizza Stone stone or on a Pizza Screen – whatever your preferred method.
- Top with your favorite toppings and bake for 8-12 minutes depending on what you’re cooking it on.
Notes
The Total Time does NOT include the proofing time since some do same day while others do 48-72 hour proofing
This makes enough dough to make :
- 3 – 265 gram dough balls
Pizza Stone
Pizza Screen
Pizza Peel
*Note: 12/7/16 The original recipe called for 2 1/2 cups of bread flour. After re-testing it I’ve found that you get better results at around 3 cups of flour plus a little extra for dusting.


In the 5th paragraph “ Allow the dough to rest, covered for 30 minutes. After 3 minutes, using very lightly floured hands” so Is it 30 minutes or 3 minutes ?
30 minutes, not 3. I just fixed it.
Best Kitchen Wishes!
This recipe has always been a success! People are shocked when the recipe says to crank the oven up to 550. Trust the process. Crank it up and let that old oven live it’s best life! 😀 If you are like me, I cringed only because I thought my old oven would break.
Also, I live in NC. It gets very humid here. I find a little less (1/2 c) flour works out great in the summer months.
So happy you love the pizza recipe Joanna! I actually video chatted with someone yesterday while they were making this recipe as they weren’t sure how to do it. He made his pizza today and shocked by how “dang easy homemade pizza dough is!” lol
Best Kitchen Wishes!
Such an incredible way recipe but I think you may have a typo for the salt as it says 1 Tbl. I went with 1 tsp and it was perfect.
Thanks for an incredible recipe!
Omg how in the world did that happen? It most definitely should be 1 tsp. Thank you for the kind words and pointing out the typo!
Best Kitchen Wishes!
I’m having a similar issue as another reviewer where the dough was way too sticky despite using 3 cups of bread flour. Followed the recipe exactly and the ‘ball’ of dough wouldn’t really form unless I added more flour to the mix until it finally wasn’t sticking to my hands enough to be able to work with it outside the bowl. Any suggestions?
Your recipe calls for water 105 to 155 degrees. I believe you probably meant 115 degrees. Thought id point that out. Thanks for the recipe. Trying it now.
Oh yes; thank you! Stupid typo! I’ll update it.
Best Kitchen Wishes!
I’ve been making pizzas for years and thought I made an awesome pie. Lady your recipe crushed mine to little pieces! By far this is THE BEST PIZZA DOUGH RECIPE I’ve ever come across! That chew, that crust, that pull – absolutely perfect! You are a pizza master!
Frankie – NY Pizza lover
You seriously bake your pizza at 550F (not even sure if my oven can go that high…) or should it be 450F?
Yes I seriously bake my pizza at that temp. When we had our pizza shop our ovens were set to 800f
Most standard ovens go to 550F. You can do 450F but it will take much longer.
Best Kitchen Wishes!
Hey Lori. I am making this Pizza crust right now (since you’re bistro isn’t open yet lol) and also since it’s National Pizza Day! Thinking of putting leftover St Louis bourbon bbq killer pressure cooker ribs on it too! Hmmmm wonder where THAT recipe came from??? Lol. But 550 degrees. SERIOUSLY? Will the center get done and the crust won’t burn? Looking at your site now for a sauce. I’m sure I will find one. 👅BTW I am doing this in my bread machine.
Hey Karen!
Lol love the BBQ ribs on the pizza! I have a recipe for that too!
But yes 550f. You cook it on the lower third rack for 8 min then move it to the middle rack for 1-3 min. Normal pizza ovens are over 750f.
Read this recipe that uses my dough recipe on how to bake it. http://www.thekitchenwhisperer.net/2017/01/07/roasted-brussels-sprouts-with-prosciutto-pizza-with-balsamic-drizzle/
Actually I have no pizza sauce recipe posted. I have my own for my company that makes me money but I want to create one just as good as mine for you all. I take pizza and sauce VERY seriously.
What are you baking it on? Screen? Pan? Stone?
Best Kitchen Wishes!
This is headed to the oven shortly. The dough is gorgeous.
Yeah I’m glad you loved it!
Best Kitchen Wishes!