• FB
  • Insta
  • Pinterest
  • X
  • TikTok
  • YouTube
  • Amazon
  • Home
  • About
  • Recipe
    Index
The Kitchen Whisperer
  • Tuesday’s
    Tips
  • Weekly
    Menu
  • Shop
  • Recipe Index
  • Shop
  • Weekly Menu
  • Tuesday’s Tips
Nov 20 2013

No Knead Sandwich White Bread

Find the recipe card at the end of the post. Make sure to read the content as it contains chef tips, substitution options, and answers to FAQs to help you succeed the first time around!

Posts may contain affiliate links that help enable me to continue to provide you with free recipes. As an Amazon Associate, I earn from qualifying purchases. Please see my Privacy Policy for details.

Jump to Recipe·Trust With Google

So when I first started this journey, there were 2 common fears everyone had when it came to cooking – making bread from scratch and making pie crusts. I’ve tackled both numerous times on here. 

No Knead Crusty White Sandwich Bread3

By far, my Artisan Crusty No Knead bread, Chocolate No Knead Crusty Bread, and Cheddar Ale No Knead Crusty Buns have pretty much taken over as numero uno for bread recipes.  They are super, SUPER easy, and require no special equipment.  A Dutch oven is best. HOWEVER, I will show you how to make it without one.

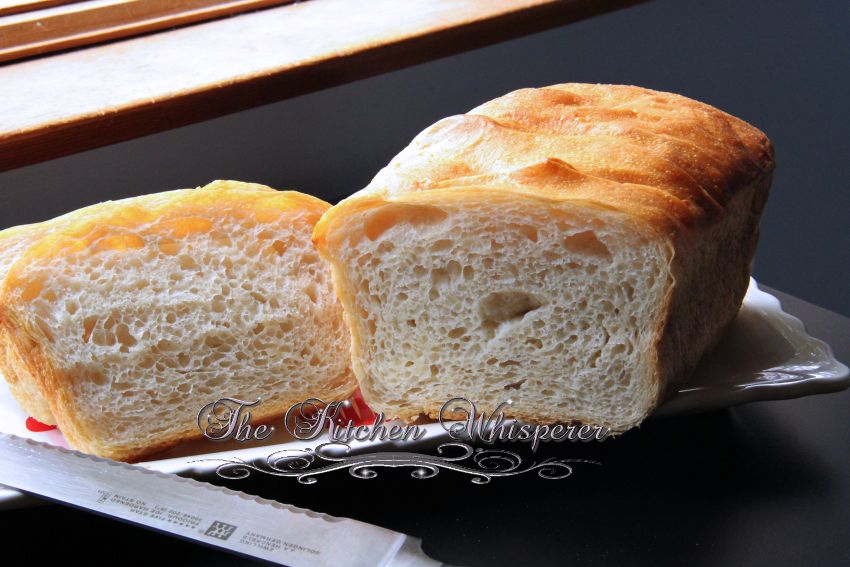
Well, those breads are fantastic, but sometimes you just want plain old-fashioned white sandwich bread.  Now I love, LOVE white bread as for me that immediately takes me to my childhood and Mom making it every Sunday. I’d sit up on the kitchen table, covered in flour from head to toe playing with a piece of dough for hours while I’d try to mimic her. It’s because of her that I fell in love with baking and not having a fear of making bread. 

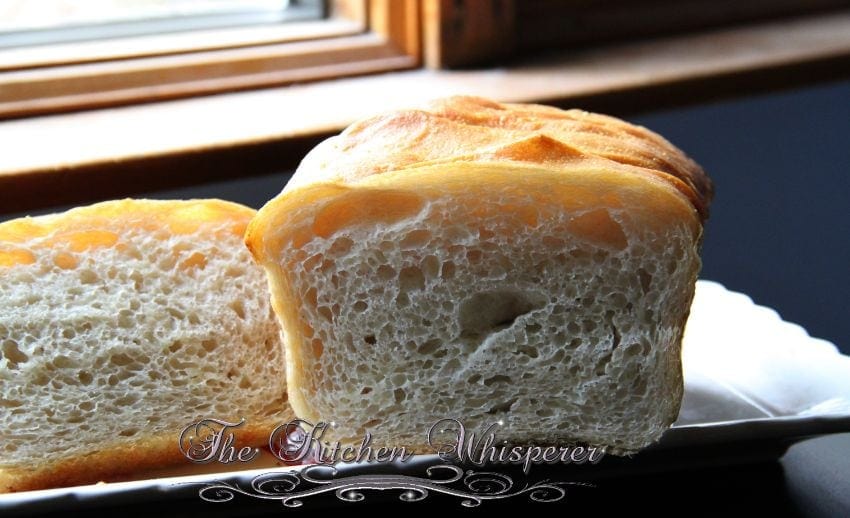
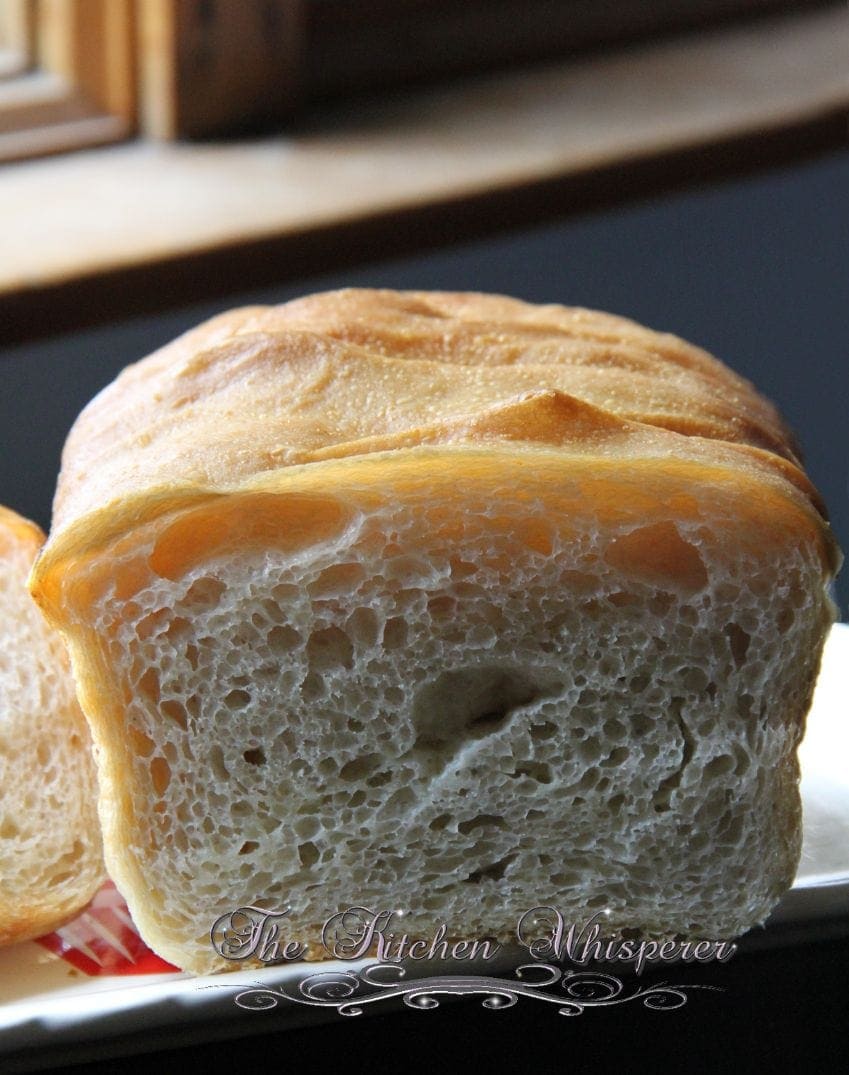
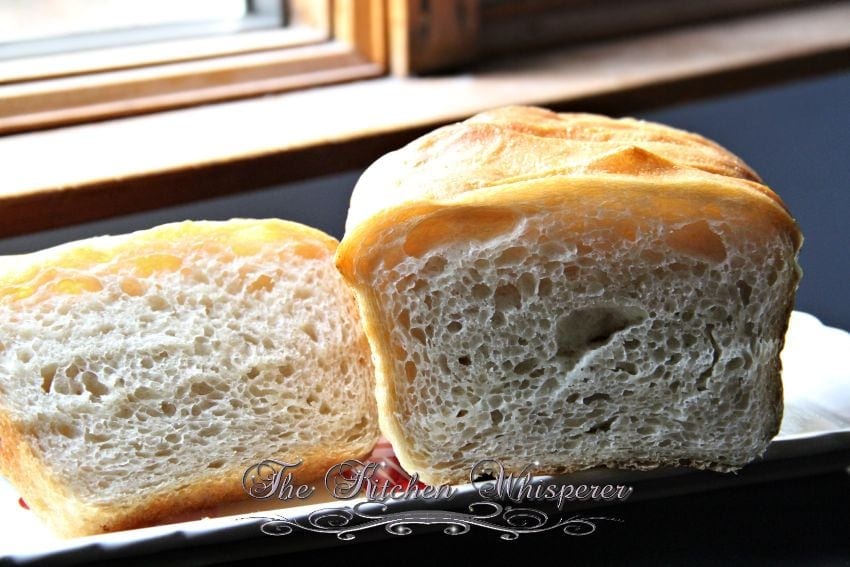
Adding those layers of butter in the folds made this bread FanFriggenTastic!  Literally, it needed no jelly, jam, or butter on it!  It took everything I had to not rip into it straight out of the oven but bread is one thing that MUST be allowed to cool before cutting.

Do you know why?  I mean other than having your Mom smack your hand or getting yelled at (trust me, I learned that lesson years ago!)  LOL

Cutting bread while it is still warm can cause the bread to have a gummy texture, and the loaf can collapse.  It tears and it’s a big ol mess. It is because of the way starch retrogrades. It needs that cooling time to re-stabilize itself.

No Knead Crusty White Sandwich Bread4

But yeah, waiting for this to cool was torture.  I mean the SMELL was intoxicating.  There is NOTHING that compares to the scent of freshly baked bread.  It’s just pure heaven.

No Knead Crusty White Sandwich Bread7

This was so good I literally had to slice a piece and leave the room; otherwise, I truly think I would have sat there and eaten the entire thing!  LOL

No Knead Crusty White Sandwich Bread5

Now I know what you’re thinking: “Just how hard is this?  I don’t have a mixer or Dutch oven.”

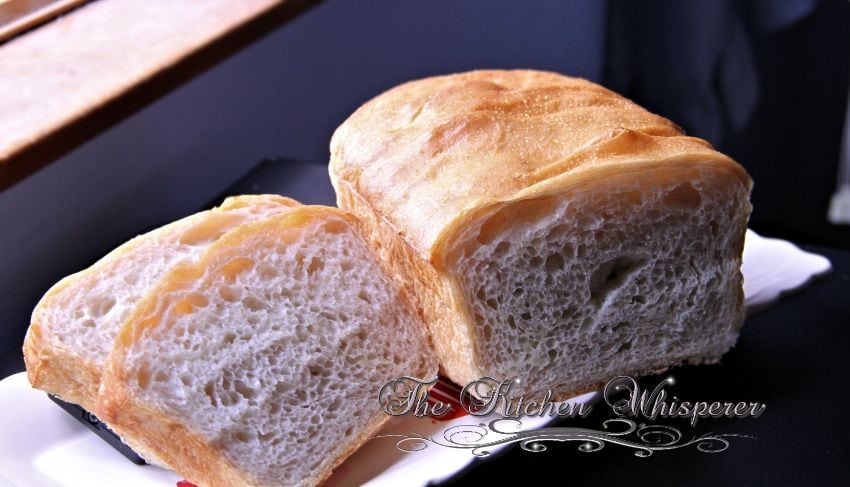
It’s not hard and you don’t need either of those things!  Literally you need the ingredients (duh), a big bowl, a wooden spoon, a bread loaf pan and an oven.  I’ve made this bread at least 10 times since I finally perfected it.  This will be your go-to white bread recipe for no kneaded bread.

What’s even more awesome is with this bread, any leftovers (if that’s even possible) the leftovers make AWESOME croutons!

I mean, seriously, can’t you smell that warmth and awesomeness?  Look at those pockets and flaky layers!  Yeah… I bet you’re wishin’ they had Smell-o-Internet now, huh?  LOL God, wouldn’t that be awesome?!

No Knead Crusty White Sandwich Bread6

*Update: apparently, my recipe is VERY similar to the one Food 52 has (like just a few ingredients are changed). While I love F52, I don’t ever recall seeing it.  I went with my white bread recipe and my first no-knead recipe and kind of did a mashup. However, since they were to the pass first and ours are so very similar, I have to give them credit. I could have seen it, but honestly, I don’t remember it. Sorry, F52, I didn’t know you had one posted a month before mine*

Print

No Knead Sandwich Bread Recipe

Print Recipe
Save Recipe Recipe Saved

5 Stars 4 Stars 3 Stars 2 Stars 1 Star

5 from 15 reviews

Find more fantabulous recipes, tips and tricks at www.thekitchenwhisperer.net. Also, join our TKW Family on Facebook

  • Author: The Kitchen Whisperer
  • Prep Time: 20 minutes
  • Cook Time: 35 minutes
  • Total Time: 1 hour
  • Yield: 2 loaves
  • Category: bread baking, breads, easy bread, no knead bread, white bread
  • Method: oven
  • Cuisine: Bread Baking, breads, easy bread, no knead bread, white bread

Ingredients

  • 3 1/4 cups Bread Flour
  • 3 1/4 cups All Purpose flour
  • 1 tablespoon instant or active dry yeast
  • 1 1/2 tablespoon salt
  • 3 cups water, warmed
  • 6 tablespoons unsalted butter, softened
  • 1 egg with one tablespoon water

Instructions

  1. Whisk together the flour, yeast, and salt in a large bowl. Add water and stir together with a wooden spoon to form a shaggy dough. It’ll take about 2-3 minutes to come together.
  2. Cover the bowl with plastic wrap and letproof at room temperature for around 5-6 hours. The dough will double in size and may start to fall. This is OK. It just has to double initially.
  3. When ready to bake, turn the dough on a floured surface and lightly knead 3–4 times. The dough will be slightly sticky, but resist putting too much flour on it. A Bench Scraper works PERFECTLY here! Cut the dough into two equal-sized pieces. Shape the dough into a rectangle approximately 8×12″. Place 1 1/2 tablespoons butter across the middle.
  4. Fold one-third of the dough into the center, and place 1 1/2 tablespoons butter on top of the fold, followed by the other third. Place seam-side-down in a buttered 9×5″ Bread Loaf Pan.
  5. Cover with sprayed plastic wrap and let rise for approximately one hour or until the dough has doubled. The dough will not rise above the pan; you want it to double in the pan.
  6. Preheat your oven to 450F with the rack in the middle. In a bowl, beat the egg and water until well combined. Using a pastry brush, brush the top of the bread with the egg wash. (See note if you do not want to use the egg). Bake for 30–35 minutes or until the top of the loaf has just begun to brown. Remove from the oven and turn out on to cooling racks.
  7. Let cool for at least an hour before slicing.

Notes

The only special piece of equipment you need is a
9×5″ Bread Loaf Pan. These truly are the BEST pans out there!

Another item I highly recommend is a Bench Scraper. This will make your life SO MUCH easier when working with doughs!

If you do not want to use the egg wash, before you preheat your oven, place a metal pan on the bottom rack. Let the oven come to temperature. Before putting the bread in the oven, lightly mist the top with water. Place the pan on the rack and immediately (WORK FAST!) pour 1 cup of hot water into the baking pan on the bottom. Close the oven door, and do NOT open it until the bread is done!

Made this recipe?

Tag @thekitchenwhisperer on Instagram and hashtag it #thekitchenwhisperer


Save

Save

Save For Later!

Make it a meal!

Pairs Perfectly With:

  • Most Awesomest No Knead Orange Cranberry Raisin Bread

    Most Awesomest No Knead Orange Cranberry Raisin Bread

  • The Best No Knead Crusty Bread from scratch

    The Best No Knead Crusty Bread from scratch

  • Nonna Approved Authentic Italian Wedding Soup

    Nonna Approved Authentic Italian Wedding Soup

Leave a Reply Cancel reply

Your email address will not be published. Required fields are marked *

Recipe rating 5 Stars 4 Stars 3 Stars 2 Stars 1 Star

40 responses

  1. Leslie
    February 5, 2017

    Can I use something else besides a 9 x 5 loaf pan ? Maybe a 9 x 13 Pyrex dish lol ??

    Reply
    1. TKWAdmin
      February 5, 2017

      Hi Leslie! You can but glass conducts heat differently than a standard metal loaf pan. Just watch so the bottom doesn’t burn with the glass pan.

      Best Kitchen Wishes!

      Reply
      1. Leslie
        February 7, 2017

        Ok. Thanks !! I just purchased 2 loaf pans. Does this recipe yield 1 or 2 loaves ?

        Reply
        1. TKWAdmin
          February 7, 2017

          One large loaf. And yeah!

          Best Kitchen Wishes!

          Reply
          1. Leslie
            February 7, 2017

            I’m sorry but this baking bread thing is new to me. Actually I really don’t bake much of anything. But you’ve inspired me. Why do the directions say #6 “cut the dough into 2 equal pieces” if the recipe only yields 1 loaf ?

            Reply
            1. TKWAdmin
              February 7, 2017

              It was a typo in the recipe. You don’t split the dough in two – not sure how that got in there but it’s a single loaf. And please never, ever apologize for asking questions. I absolutely love it when people show an interest and I can help (even through the fat-fingered typos). However I can help you I will! What I want to do, once this house is finished with the construction is hold Saturday “live” baking and cooking sessions on line where I can give a ‘recipe’ ahead of time that I’ll be making live through Facebook/Instagram while I chat. I think that’s the next level for me – just have to finish this house.

              But please ask 9 million questions 🙂

              Best Kitchen Wishes!

              Reply
              1. Spencer
                May 26, 2017

                The 6.5 cups of flour seems a lot for one loaf (based on other recipes), as the dough ball seems like it will mostly fill a 9×5 loaf pan without doubling. That is fine (I believe you), but you had said that there was a typo about halving the dough for baking, and now it’s just one loaf. But the recipe calls for 6 Tb of butter, but the steps only use 3. So are there a series of typos, or something else going on? I’m making it as written, but I just wanted to let you know that I’m confused.

                Reply
                1. TKWAdmin
                  May 26, 2017

                  Hey Spencer. Let me look at this again. As what I’m looking at shows it’s only 3 1/4 cup of flour, 6 1/2 cups would be a double batch. Originally it was for 2 loaves but I reduced the ingredients but forgot to remove the “splitting the dough” line. The recipe only uses 3 Tbl butter. Lines 7&8 you put half down, fold the dough then the rest.

                  I’m thinking it’s a caching issue,

                  I’m sorry it’s confusing. I’m looking at my post online and compared it to what’s in my recipe database and it matches. This is the recipe I see:

                  3 1/4 cups Bread Flour
                  3 1/4 cups All Purpose flour
                  1 Tbl instant or active dry yeast
                  1 1/2 Tbl salt
                  3 cups water, warmed
                  6 Tbl unsalted butter, softened
                  1 egg with 1 Tbl water
                  Instructions
                  Whisk together flours, yeast, and salt in a large bowl.
                  Add water and stir together with a wooden spoon to form a shaggy dough. It’ll take about 2-3 minutes to come together.
                  Cover the bowl with plastic wrap and let proof at room temperature for around 5-6 hours. The dough will double in size and may start to fall. This is OK. It just has to double initially.
                  At this point the dough can be used immediately, or covered with plastic wrap and kept in the fridge for up to two weeks.
                  When you’re ready to bake, turn the dough out on a floured surface and lightly knead 3–4 times. The dough will be slightly sticky but resist from putting too much flour on it. A Bench Scraper works PERFECTLY here!
                  Shape the dough into a rectangle approximately 8×12″.
                  Place 1 1/2 tbl butter across the middle.
                  Fold one third of the dough into the center, place 1 1/2 tbl butter on top of the fold followed by the other third.
                  Place seam side-down in a buttered 9×5″ Bread Loaf Pan.
                  Cover with sprayed plastic wrap and let rise for approximately 1 hour, or until the dough has doubled in size. The dough will not rise above the pan; you just want it to double in the pan.
                  Preheat your oven to 450F with the rack in the middle.
                  In a bowl beat the egg and water until well combined.
                  Using a pastry brush, brush the top of the bread with the egg wash. (See note if you do not want to use the egg).
                  Bake for 30–35 minutes, or until the top of the loaf has just begun to brown.
                  Remove from the oven and turn out on to cooling racks.
                  Let cool for at least an hour before slicing.

                  Reply
  2. Leslie Myers
    May 16, 2015

    Oooooh, and no sugar in the bread? How interesting! I’m trying the recipe now….

    Reply
    1. TKWAdmin
      May 16, 2015

      No, no sugar Leslie. It won’t hurt to add it but I prefer my white bread without it. Let me know what you think!

      Best Kitchen Wishes!

      Reply
      1. Leslie Myers
        May 17, 2015

        I used between roughly 30 oz flour, plus a little bit more as I was shaping the dough to put in the pan. I followed the recipe exactly, except I used about a cup of ice in the bottom of the oven rather than the egg wash or pan of water. I baked at 425 to an internal temperature of 190 degrees. I have a gas oven, and when I bake at higher temperature my bread browns too quickly. It is delicious! Looks and tastes great. Thank you!!

        Reply
        1. TKWAdmin
          May 18, 2015

          When’s the last time you checked your oven temp to ensure that 425 is truly 425? My oven started to ‘burn’ stuff which didn’t make sense. Here my thermostat went bad. A quick $10 part saved me a ton of headaches and burnt food!

          So thrilled though that you loved it!

          Best Kitchen Wishes!

          Reply
  3. Leslie Myers
    May 16, 2015

    Hello,

    I was wondering about the weight of your “cup” measurement. Is it 4.5 oz? 5 oz? People measure differently, so I like to have the actual weight in oz or grams.

    Thanks!

    Reply
    1. TKWAdmin
      May 16, 2015

      Hi Leslie!

      It’s 4.5 ounces for bread flour. I do the spoon scoop method into the cup then weigh it.

      Best Kitchen Wishes!

      Reply
  4. Audrey
    February 25, 2015

    I am looking for a no knead whole wheat bread recipe that is softer than the dense stuff I’ve been producing. Has anyone tried this by subbing half the flour with whole wheat? Most of the other soft sandwich WW recipes involve a bunch of extra ingredients and kneading. I’m hoping to avoid some of that.

    Reply
    1. TKWAdmin
      February 25, 2015

      Hi Audrey!

      As for the substitution of 1/2 wheat flour, you can replace white flour with whole-wheat flour cup for cup. For every cup you exchange, add five teaspoons of water. Add additional flour only when needed while shaping. HOWEVER if you are going with all whole wheat you need to add at least 2 Tbl of vital wheat gluten.

      If you are making bread with 100 percent whole-wheat flour, add two teaspoons of vital wheat gluten per cup to create a stronger structure and higher rise. For each teaspoon of wheat gluten you use, add another one and a quarter teaspoons of water. If using 100 percent whole-wheat flour, allow the dough to rise in volume by just one and a half times, as opposed to the typical two times.

      Give that a shot!

      Best Kitchen Wishes!

      Reply
  5. Rebecca
    January 20, 2015

    OMG… I have to tell you this is the first time I tried a Sandwich bread…. and I am so GRATEFUL I chose yours…it came out absolutely delicious….

    I did not have the right size pans as all of my dishes, glassware & bakeware are all Pyrex from the 50/60’s so my pans are much smaller than you call for. I was able to make 4 loaves but probably could of gotten away with just 3. I also have a convection oven and have YET to learn to properly cook in it (was in the house when we moved in).

    My crust was a bit harder than we like for a sandwich bread, but OH SO DELICIOUS for a jam on fresh bread crust.
    I also did not have ‘bread’ flour, I just used plain AP Flour, not sure if that makes a difference either.

    My family is just CRAZED about this bread and it has only been out of the over 90 minutes and 1 loaf is already gone…

    I used the ‘active dry yeast’ to do mine and did the 7 hr rise as you had explained that the active just needs more time to rise.

    Can I replace 1/2 the flour for ‘wheat’ next time… We typically are not ‘white’ bread eaters, we usually eat more whole grain or soft wheats.

    I AM SO GRATEFUL I FOUND YOUR SITE….

    THANK YOU for helping us become MORE self sustainable on our small hobby farm with your breads….

    Rebecca
    MisFitsFarms

    Reply
    1. TKWAdmin
      January 20, 2015

      Hi Rebecca!

      Thank you so very much!!! Yes the bread flour in the difference in bread making. If you don’t have it on hand you can make your own with ap flour and vital wheat gluten. (https://www.thekitchenwhisperer.net/2013/05/04/how-to-make-bread-flour/)

      I love that they already went through a loaf! One of my best friends made bread for the first time the other day using this recipe and she went nuts over it! She couldn’t believe how easy it was.

      As for the substitution of 1/2 wheat flour, you can replace white flour with whole-wheat flour cup for cup. For every cup you exchange, add five teaspoons of water. Add additional flour only when needed while shaping. HOWEVER if you are going with all whole wheat you need to add at least 2 Tbl of vital wheat gluten.

      If you are making bread with 100 percent whole-wheat flour, add two teaspoons of vital wheat gluten per cup to create a stronger structure and higher rise. For each teaspoon of wheat gluten you use, add another one and a quarter teaspoons of water. If using 100 percent whole-wheat flour, allow the dough to rise in volume by just one and a half times, as opposed to the typical two times.

      Please share some pictures on twitter (@TKWhisperer) or on Facebook (www.facebook.com/thekitchenwhisperer) or shoot me an email with them at lori@thekitchenwhisperer.net I’d love to see them!

      Best Kitchen Wishes!

      Reply
  6. Cindy
    December 10, 2014

    Great blog! I’m curious how well this bread toasts? Can’t wait to try it.

    Reply
    1. TKWAdmin
      December 11, 2014

      Thank you Cindy! I LOVE this toasted! It’s gets kinda crunchy on the outside but the inside stays soft and almost melts when you eat it.

      Best Kitchen Wishes!

      Reply
  7. Tisch
    November 19, 2014

    From what I understand, bread machine yeast IS instant yeast. I have used it for lot of no-knead bread recipes and it always works perfectly. I had the same type of yeast as mentioned above (Red Star bread machine Quick Rise) and used it for this recipe and it turned out fine. So if you’ve got it on hand it is fine.
    Along with that, WOW on the recipe. How much the butter makes the difference with making a soft sandwich bread! I never thought of it before. I spread my homemade jam on it and I just wanted to eat the whole loaf. I did have the willpower and resisted though, thankfully. I’m not a huge butter fan, as I try to go a little healthier usually so I used Smart Balance Flax Oil butter. I used a little less and since it’s spreadable I just spread a thin layer along each fold I made. Thank you lots for this recipe. It will be my go-to for my bread loaves from now on.
    Anyone interested, do give it a try. I would like to put this recipe on my blog next time I make it, if that is alright with you. 🙂

    Reply
    1. TKWAdmin
      November 20, 2014

      Hi Tisch!

      Thank you SO much for your comments. I have the BIGGEST smile on my face 🙂 Yes the trick to super soft bread is the butter.

      You are welcome to link back to this recipe or repost it but please cite the source. Also shoot me a link when you post it and I’ll be sure to send folks your way!

      Best Kitchen Wishes!

      Reply
  8. Angela
    November 11, 2014

    This worked great. I made both loaves and they came out wonderful. I was so excited to try it I made both loaves, which left is with a lot of bread. There was a 1/2 loaf this morning going stale, so i made french toast. The best we have ever eaten thanks to the bread. So now I’m told I always have to make 2 loaves so we have french toast leftovers. :).

    Reply
    1. TKWAdmin
      November 13, 2014

      That’s awesome Angela! There is never too much bread 😉 This bread makes awesome croutons as well! Great thought about the french toast!

      Best Kitchen Wishes!

      Reply
  9. Angela
    November 4, 2014

    Thanks!! Trying round 2 with the new yeast tonight. Fingers crossed!!

    Reply
    1. TKWAdmin
      November 4, 2014

      You got this girlfriend! Let me know how it turns out!

      Best Kitchen Wishes!

      Reply
  10. Angela
    October 26, 2014

    Hi kitchen whisperer! I tried to makes this bread but I think I ran into an eb-kao (error between kitchen and oven) aka me. I think I’m using the wrong yeast I was at the grocery store and only saw 2 yeasts. Both red star. Quick rise yeast for bread machines and traditional baking (instant dry yeast) and another (that I didn’t buy) that said something like dry active yeast. I saw instant yeast on the quick rise jar so I bought it but I’m starting to think I chose poorly :). I read some of the comments on the artisan bread (which I have proofing). So my question is….is the “other yeast” the one that’s said “active dry yeast” the one I should be using? I think I was confused because the “quick rise” jar said “instant”. And is the correct yeast for this bread the same one I should use for the artisan?? Thanks!

    Reply
    1. TKWAdmin
      October 26, 2014

      Hi Angela!

      For this recipe I use either instant (http://astore.amazon.com/thekitcwhis-20/detail/B00BGBXO6E) or active dry (http://astore.amazon.com/thekitcwhis-20/detail/B003Z7UR2Q). Unfortunately the yeast you bought is the wrong type. You needed either the instant (not bread machine) or the active dry.

      Yeast can be confusing at times. I really should write a post explaining the differences between all of them as they aren’t interchangeable.

      For the artisan breads (no knead ones) go with the active dry or the instant like I have in the links above).

      Best Kitchen Wishes!

      Reply
1 2
Newer Comments→

Welcome!

I’m Lori, The Kitchen Whisperer®! Let me help you tame the kitchen one bite at a time.

More about Lori

Let’s be friends

  • Facebook
  • Instagram
  • Pinterest
  • X
  • TikTok
  • YouTube

Legend


AF Air Fryer B Base Recipes BBQ BBQ Method FM Freezer Meals IP Instant Pot MP Meal Prep O Oven Method PF Party Foods SC Slow Cooker S Smoker Method

Deliciousness Delivered.

Sign up to receive delicious recipes, kitchen tips and weekly menus (bacon, pizza, & BBQ oh my!) straight to your inbox.

Click to Subscribe
Text: this week's menu

Subscribe for delicious new recipes, kitchen tips & weekly menus

Join the TKW Family

What’s trending on TKW

  • Best Super Soft and Chewy Hoagie Rolls
  • Mom’s Classic Easy Stuffed Cabbage Rolls – The Best Recipe!
  • The Ultimate Slow Baked Boneless Short Ribs Recipe
  • Authentic Belgian Waffle Recipe
  • Best Ever Pork Roast and Sauerkraut
  • The Best Portabella Mushroom Veggie Burgers
  • Easy and Juicy Cornish Game Hens
  • 45 Easy & Delicious Pellet Smoker Recipes
  • Smoked Hot Honey Butter Spatchcock Chicken
Back to Top
Recipe Index
Instagram feed
Contact
Terms & Conditions
Privacy Policy
  • Facebook
  • Instagram
  • Pinterest
  • X
  • TikTok
  • YouTube
  • Amazon