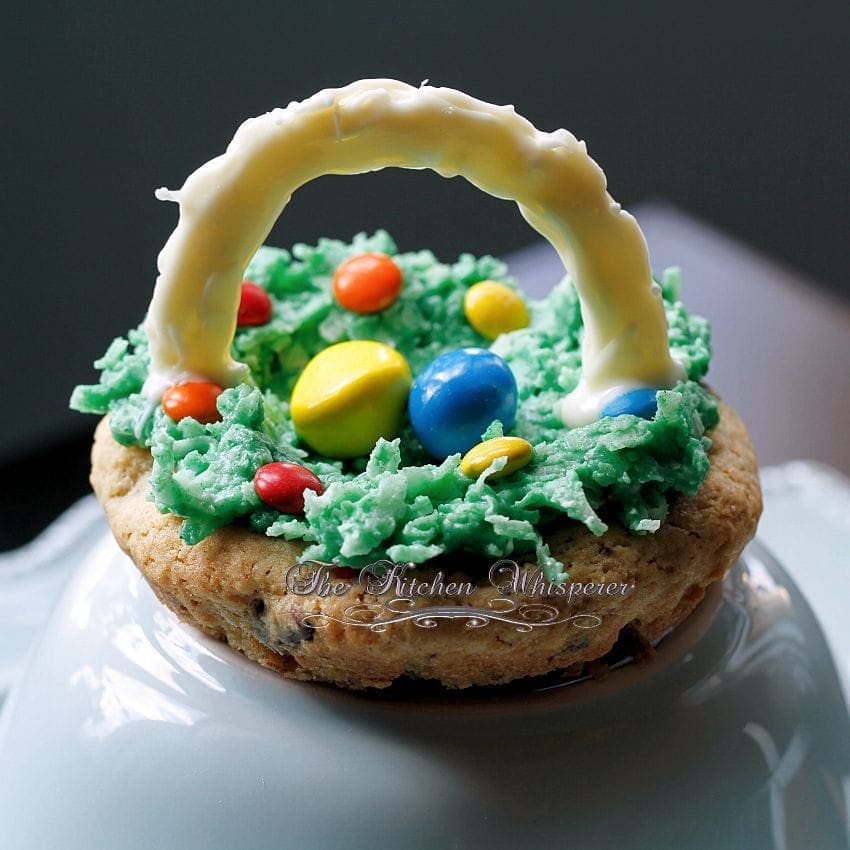
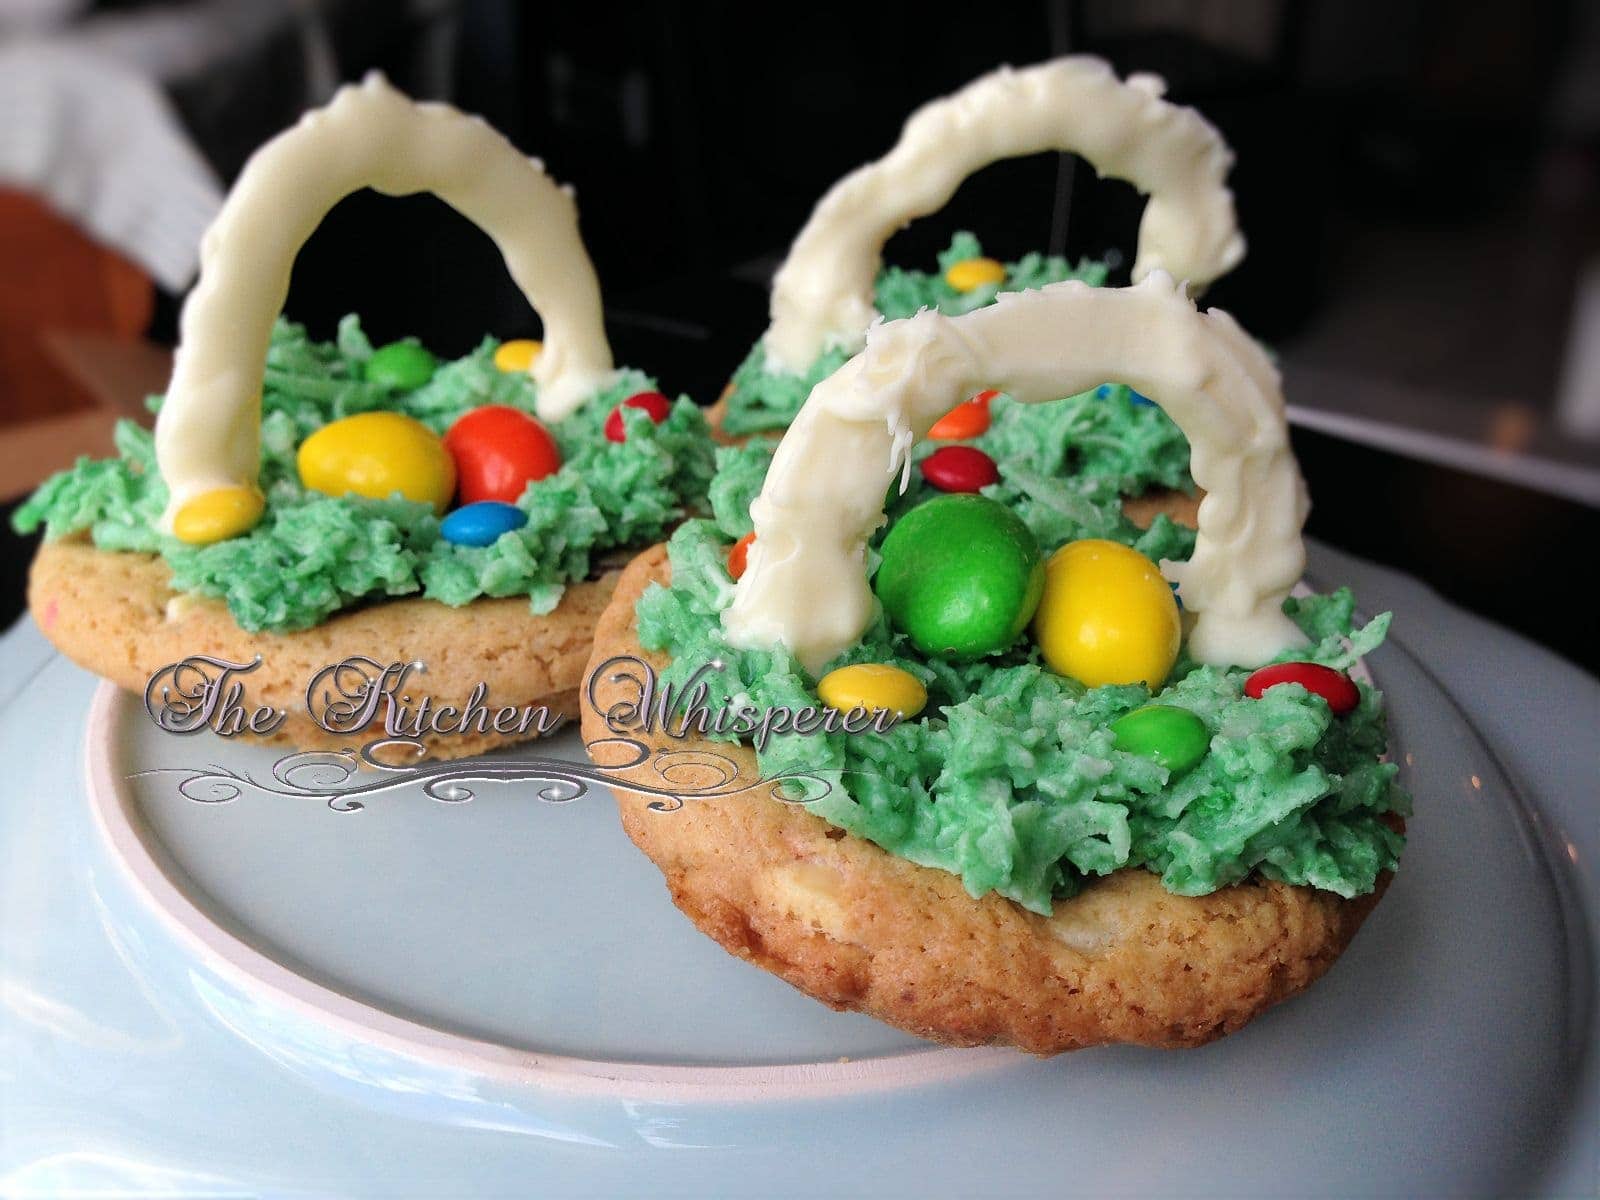
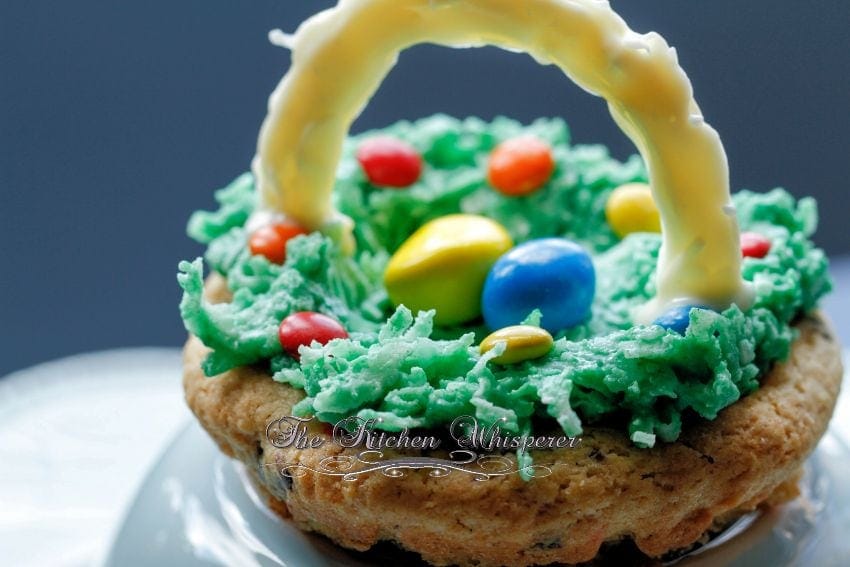
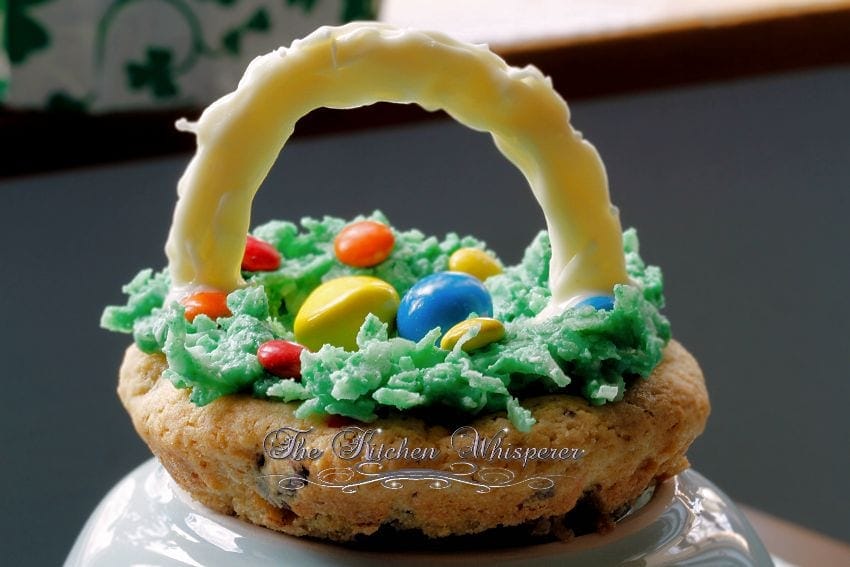
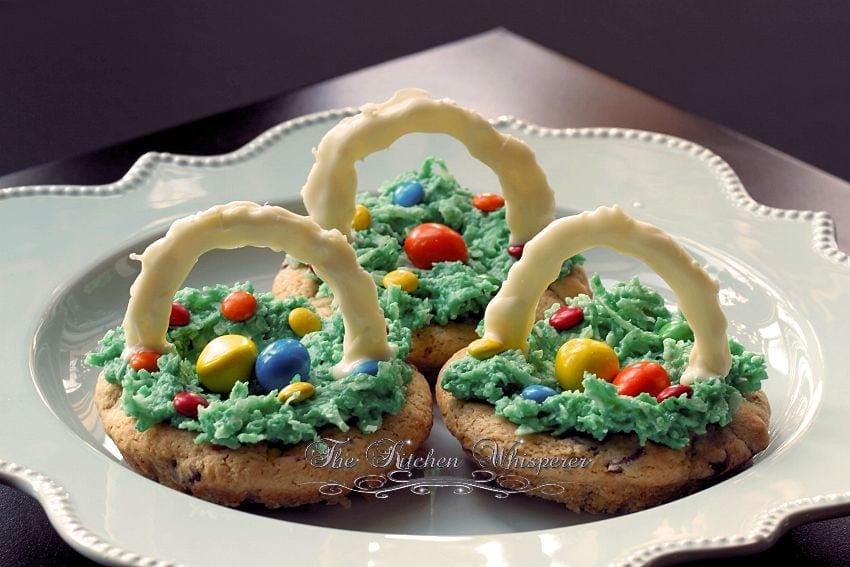
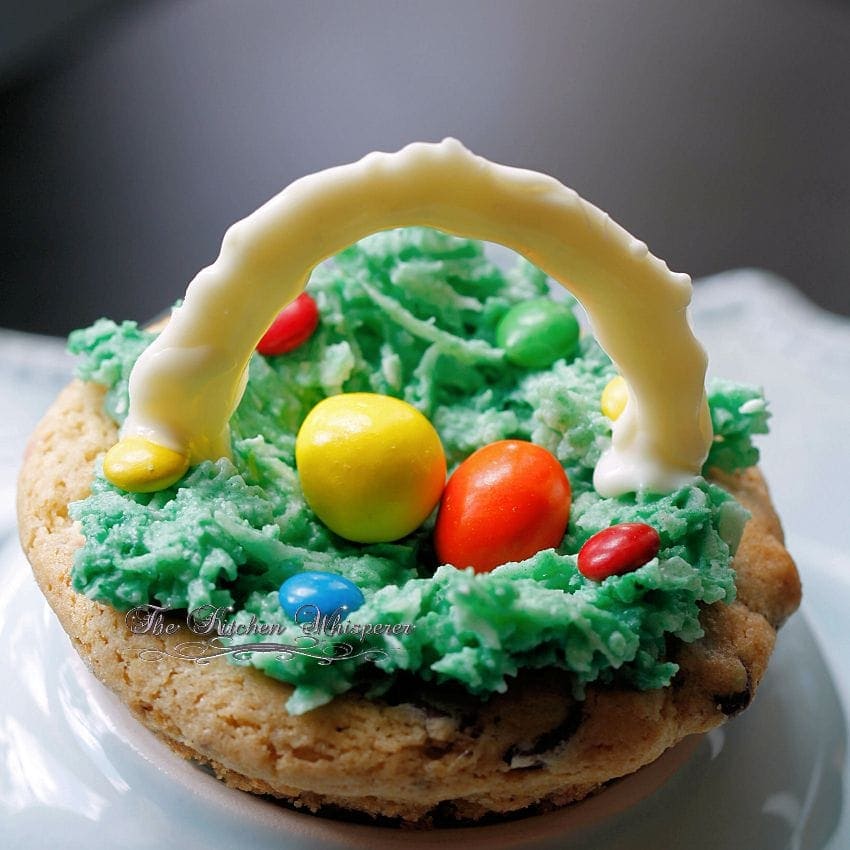
An edible cookie easter basket made of chocolate chip cookie dough, filled with coconut, candies, and finished with a chocolate basket handle!
Besides getting a basket full of gum as a kid (I was never a big candy person), dying Easter eggs was one of my favorite things. Seeing all those pretty colors, getting multi-colored finger tips, and spending time with my siblings and Mom doing them was the best.
Now even though it’s just Mr. Fantabulous and I, I still dye eggs just because you have to for Easter. It’s like a law or something. Well this year I wanted to start a new family tradition since a new generation of Foodies are being raised out there. You have no idea how much it thrills me when I hear from parents telling me how much their kids love me, my site and the recipes. That they love being in the kitchen; learning to appreciate food. That to me is priceless. I see it as a WIN-WIN. One, we’re raising a new generation of future cooks and bakers and two, you’re creating memories and traditions with loved ones.
When I shared my Itsy Bitsy Spider cookies with you all, it literally blew up over night on the Internet. It trended on Twitter for weeks, was one of the highest pinned recipes, shared millions of times. Folks went nuts over this which makes my day. Well with Easter approaching I wanted to come up with something like that. I originally thought about painting Easter Eggs on cookies so when I made them they turned out really cool but they were pretty time consuming to make and a little more meticulous than the spider ones. So I had to think of what else symbolized Easter then it dawned on me.. Easter Baskets!!!
These cookie baskets are so flippin cute I can’t stand it! Now the only specialty equipment you need is a Whoopie Pie Pan only because it makes these so much easier. HOWEVER if you don’t have one you can use a muffin tin. Just line the tin with parchment and only fill them up about half way. As soon as you take them out of the oven you’ll want to press down just a bit in the center to help create that well in the middle.
It’s funny as when I was making these Mr. Fantabulous came out looking at me like I had lost my mind because my hands were green from tinting the white chocolate ‘grass’ and I had M&M’s lined up. As I placed the grass on top and then the candies he was like “Um, what is that?” to which I responded “Easter Baskets”. He gave me a look and said “Um, that’s one butt ugly Easter Basket. It looks funky and I don’t see it. You’re not going to post that are you???”
*sigh* I could have continued on with “Um I’m not done and why aren’t you working on the basement that you said would only take 3 months to do that is now going on 4 1/2 years???” but I didn’t and proceeded to have selective hearing.
Speaking of selective hearing, do any of you do this? Like you do hear someone call you, the phone ring or even the doorbell but yet somehow you can sit there calmly and ignore it? Is that wrong to do? I find that I do that at times when I just don’t want interrupted or refuse to holler to the other side of the house to answer someone. I’m infamous for doing that as I HATE to yell into a room half way across the house. If you’re asking me a question that requires you to yell it to me then get up off of your butt and come ask me in person. So yes Mr. Fantabulous, my love, my hearing is perfectly fine … when it needs to be.
I know, I’m awful *wink*

So as he went into the dining room/our make shift studio since our basement is still not done (can you tell this is a sore spot for me???), I went to finishing up my butt ugly Easter baskets as my darling husband called them. Pfft! He just has no vision and imagination! To make the chocolate handles were pretty easy but you need patience. You don’t need to know how to draw or be an artist. Trust me, if *I* who cannot draw a stick figure proportionate to save her soul can do this, you can! Just melt the chocolate, put it in a piping bag (or a squeezie bottle) and just draw a rainbow that’s a little smaller than width of your cookie. You want it to rest in the grass, not outside it.
So I got my parchment paper out and got to piping away. Now if you’re not that sure of controlling a piping bag with melted chocolate then definitely use a squeeze bottle. Just grab one from the dollar store. You may want to make the opening on the tip a bit bigger; totally your call. After I made the first pass and let them dry I hit them up again with another layer of chocolate. See I wanted these fat, some girth to them if you will. These only took a few minutes to dry. I used a metal spatula to lift them up off of the paper. Now you could easily stop there but I wanted the handle to be more rounded; more realistic.
To do this I just flipped the handle over, placed it back on the parchment paper and carefully piped on some more melted chocolate. I repeated this twice and Voila! rounded handle!
Now what’s awesome is this, other than making the handle, can be done with the kids! Help them put the grass on and let them decorate with whatever they want! Jelly Beans, M&M’s, chocolate eggs, even one of those Marshmallow Peeps if they want. Let them ‘glue’ the handles on and watch the baskets come to life before your eyes. Once you add the handle THEN you have a basket.

About half way done Mr. Fantabulous came back into the kitchen for a snack (God what I wouldn’t do for his metabolism!) and as he was stuffing, no.. inhaling, the peanut M&M’s he spied a finished basket. He actually stopped mid-mouth shove and stared. And before he tossed a few more into his mouth he said “Wow honey, those are the coolest things EVER! They totally look like Easter Baskets! I’m so glad you listened to me and made them prettier.” Wait, huh? “Listened to you??” At that point I saw his mouth moving not only from chewing but I think he was talking to me (selective hearing kicked in here obviously as all I heard was silence and just stared at his gorgeous M&M peanut stuffed face).
It wasn’t until I saw him reach for one did I tune back in to what he was yammering about. I said “No, they aren’t done yet so you can’t eat one. The chocolate needs to set besides aren’t you full from eating 10,000 M&M’s just now?” Without missing a beat his response simply was “No, those don’t count. They were just an appetizer for the real food.”
Wait, what??? Since when did M&M’s become an appetizer?
*shakes her head* Tis never a dull moment with that man
The the barrage of questions ensued. “What are these made out of? What’s the green stuff? Is it edible? How do I eat it? Can I eat the handle?” Okay wait a sec.. who puts inedible things on a cookie? I mean really? Oy! It’s such a good thing he’s so damn sexy. LOL Actually it’s pretty cool that he asks me all these questions as that means he’s genuinely interested. That to me means the most. To know what he not only supports me but also is truly interested and wants to learn.
So this Easter, while you’re dying eggs, introduce a new Easter family tradition. These make great gifts for family and friends plus they are the cutest things ever!
PrintChocolate Chip Easter Basket Cookie Recipe

An edible cookie Easter basket made of chocolate chip cookie dough, filled with coconut, candies, and finished with a chocolate basket handle!
- Prep Time: 10 minutes
- Cook Time: 15 minutes
- Total Time: 30 minutes
- Yield: ~12-16 cookies
- Category: candy cookies, chocolate chip cookies, cookies, easter basket
- Method: oven
- Cuisine: candy cookies, chocolate chip cookies, cookies, easter basket
Ingredients
- 1 1/2 sticks unsalted butter, chilled (12 tablespoon)
- 1 1/4 cups brown sugar, packed
- 3/4 cup white sugar
- 2 large eggs
- 2 1/2 cups all purpose flour, sifted
- 1 teaspoon baking soda
- 1 1/2 teaspoon baking powder
- 1 tablespoon cornstarch
- 1/2 teaspoon salt
- 1 teaspoon vanilla bean paste
- 2 1/2 cups milk chocolate chips
- 2 cups shredded coconut
- 3–4 drops of green gel paste
- 4 cups white chocolate, chopped – divided
- Peanut M&M’s
- Mini M&M’s or Jelly Beans
Instructions
- Add the butter to the bowl of a stand mixer fitted with the paddle attachment. Beat until smooth and creamy (~2-3 minutes). Add in both sugars and beat until well blended. Add the eggs and vanilla bean paste, and beat until fully incorporated.
- Add the flour, baking soda, baking powder, salt, and corn starch; whisk to combine. With the mixer on low, slowly add the dry ingredients until combined. Turn the mixer off and add in 2 cups of chocolate chips. Mix just until incorporated (no more than 10-15 seconds).
- Place the dough in a bowl, cover, and refrigerate for 1 hour. When ready to bake, preheat the oven to 350°F with the rack in the middle.
- Line a Whoopie Pie Pan with parchment paper. The weight of the cookies will push the parchment paper into the cavities. Using a medium cookie scoop, scoop out a 1 1/2″ ball. Place each scoop into a cavity of the pan and press down to fill up the space. You want the dough just slightly less than the top of the pan, as it will rise while baking. Bake for 9-11 minutes or until lightly golden brown.
- Remove from the oven and cool in the pan for 3-4 minutes.
- Using a spatula, gently remove the cups from the pan and place them on a cooling rack. The cookies should have a slightly sunken center. If they don’t, gently push down just a tad to help make the basket shape.
- Melt 2 1/2 cups of white chocolate in a large glass bowl. Add the shredded coconut and mix until well coated. The coconut should be stiff but moldable. Add the green gel paste and stir until the desired grass color is achieved. Divide the grass evenly on top of the cookies, making a nest with the center just slightly lower than the sides.
- Place 2 peanut M&M’s in the center and garnish the edges with jelly beans or mini M&M’s.
- While the cookies are cooling, place a piece of parchment paper on the table (can set on top of a plate). Melt the remaining white chocolate until smooth.
- Place half of your chocolate into a piping bag with a small tip or use a squeeze bottle. Draw out handles on the parchment paper. Allow to cool and then pipe more chocolate on top to make them thicker. Once completely cooled, use a spatula and gently flip the handles over. If your remaining chocolate has hardened, melt it again and place it in a piping bag. Carefully pipe chocolate on top of the backs of your handles to make them more round. Cool completely.
- To attach, place a dab of melted chocolate on the bottom of each handle and ‘glue’ it to the cookie. Pipe a little bit of chocolate around the base of the cookie’s handle and hold it in place for a few seconds. Allow the chocolate to cool completely and harden before storing it in an airtight container.


Leave a Reply