• Skip to primary navigation
  • Skip to header navigation
  • Skip to footer navigation
  • Skip to main content
  • Skip to primary sidebar
  • Work with Me
  • Press/PR
  • Contact
Display Search Bar

The Kitchen Whisperer

  • Home
  • About
  • Recipe Index
  • Shop
  • Weekly Menu
  • Tuesday’s Tips

May12018

Tuesday’s Tip with The Kitchen Whisperer – Chef Tip for Rice Cereal Treats

The worst part about making rice cereal treats is that it sticks to everything. Today I’m sharing with you some chef tips for the best rice cereal treats!

Growing up Mom always made rice cereal treats. They were inexpensive, fed a huge crowd and didn’t take a lot of effort. Well okay they were a pain in the butt when you had to smush the mixture into the container. It stuck to everything. One time I had it in my hair, my cheek and on my chin. LOL Today I’m sharing with you some of my tricks I’ve learned throughout the years of making these (and cleaning it off of my hands and everything else).

I didn’t know this but I married a rice cereal treat SNOB. He’s like the Goldilocks of cereal treats “This one is too hard. This one doesn’t have enough marshmallow pull. This one is too soft.” Seriously it’s pretty much what 4 ingredients – cereal, butter, marshmallows and salt. I’m not a fan of adding vanilla but if that’s your schtick, go for it. For the longest time I refused to make them as I was tired of having them stick to the spoon when I mixed it and then, when I tried to put it into the pan, not spread. But I love him so I had to come up with some tricks to make my life easier. Hopefully these will help you too!

  1. Use fresh marshmallows. Don’t reach for that rogue bag in the back of the cabinet that, when you press the marshmallow, it’s firm. You want squishy.
  2. Extra marshmallows? Yes please! Most recipes call for about 40 large marshmallows or 5 cups of mini ones. I tend to add about 60 or 7 cups. I like extra. OR if you wanted, while you’re stirring your cereal into the melted marshmallow mixture just add in a cup or so of mini marshmallows.
  3. Use a non-stick pan to melt your marshmallow mixture and to mix your treats in. This will make clean up a breeze.
  4. Make sure the pan is large enough to mix all of the items in. Trust me I made the mistake of using a smaller pan and I had rogue cereal on my floors for the longest time!
  5. Melt the butter first then add the marshmallows stirring them to coat with the butter. Take it slow on melting them. You don’t want them to brown.
  6. Grease your spoon or spatula BEFORE combining the cereal and marshmallow mixture. Use a sturdy spoon/spatula – trust me on this. I had a flimsy one and it was a waste of time and effort.
  7. After you dump your mixture into your prepared pan, spray your hands with cooking spray (side note – remove your rings on this; trust me on this one). Spraying your hands will make it so you can press the cereal mixture down into the pan without it sticking to the spoon or your hands. If you find it’s starting to stick, just re-spray. Conversely if you don’t want to use this you can lightly wet your hands and then press. Just watch how much water you use as you don’t want them to be soggy.
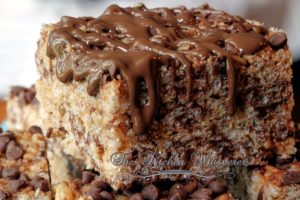
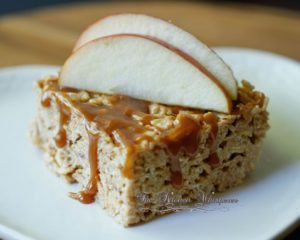
  8. Adding extras: If you want to add sprinkles, chocolate chips, toffee or candy to your cereal treats, after you mix it you need to allow the mixture to cool slightly before adding them. If you add it when it’s warm the items will melt. Just use your muscles to stir it all together and then add to your prepared pan.

Pairs Perfectly With:

Amazing Brown Rice Crispy Bars
Peanut Butter Cup Oreo Rice Crispy Bars
Caramel Apple Rice Crispy Treats

Sharing is caring!

Previous Post
Next Post

Reader Interactions

View Comments

Recipe Reviews & Comments

  1. cryssT says

    May 1, 2018 at 5:30 pm

    Good ideas, all of them, thanks.
    Guess I’ll whip up a batch for the grandkids.

    Reply
    • TKWAdmin says

      May 1, 2018 at 7:09 pm

      You are most welcome!

      Best Kitchen Wishes!

      Reply
  2. Jean says

    May 1, 2018 at 1:06 pm

    Thank you for these VALUABLE tips! I’ll try them all.

    Reply
    • TKWAdmin says

      May 1, 2018 at 7:09 pm

      You are most welcome!

      Best Kitchen Wishes!

      Reply

Leave a Comment & Review Cancel reply

Primary Sidebar

let’s be friends

Subscribe for delicious new recipes, kitchen tips & weekly menus

Yeah!!! I'm so happy you are joining the TKW Family! You will get an immediate email asking you to confirm your subscription. If it's not in your inbox check your SPAM or JUNK folders. If you do not confirm it, you won't receive my newsletters.

What's Trending on TKW

The Best Cheesy Reuben Wonton Appetizers
Instant Pot Sticky Gochujang Pork Belly Burnt Ends
Grilled Nashville Hot Chicken & Potato Bites
How To Perfectly Grill Italian Parmesan Asparagus
Instant Pot Homemade Cheesy Hamburger Helper
Instant Pot Mexican Pulled Chicken
Everything Bagel No Knead Focaccia with Garlic & Oregano
Chunky Portabella Mushroom Veggie Burgers
The Best Super Soft and Chewy Hoagie Bread Rolls
Back to Top
  • Recipe Index
  • instagram
  • Contact
  • Terms & Conditions
  • Privacy Policy
Site CreditsDesigned by Melissa Rose Design.Developed by Once Coupled.
42 shares