• FB
  • Insta
  • Pinterest
  • X
  • TikTok
  • YouTube
  • Amazon
  • Home
  • About
  • Recipe
    Index
The Kitchen Whisperer
  • Tuesday’s
    Tips
  • Weekly
    Menu
  • Shop
  • Recipe Index
  • Shop
  • Weekly Menu
  • Tuesday’s Tips
Jan 22 2013

The Best No Knead Crusty Bread from scratch

Find the recipe card at the end of the post. Make sure to read the content as it contains chef tips, substitution options, and answers to FAQs to help you succeed the first time around!

Posts may contain affiliate links that help enable me to continue to provide you with free recipes. As an Amazon Associate, I earn from qualifying purchases. Please see my Privacy Policy for details.

Jump to Recipe

Whether you’re a novice or an experienced bread baker, No-Knead bread is the easiest and one of the tastiest bread you’ll ever make! Just dump it in a bowl, mix, and let it rest overnight, and dump it into a Dutch oven the next day to bake!  Easy, peasy, delicious!

So we all know that I love, no… I LOOOOOOOOOOOOOOOVE bread in like a big way.  However, I try not to eat a lot of it because it does tend to settle directly on my thighs.  I truly think it just bypasses my mouth and goes directly to my stomach and thighs to rest like forever.  LOL  Honestly, I think it’s a ‘winter’ thing for me as typically in the warmer weather I want nothing to do with it. Don’t get me wrong, I love it but the last thing I want on a hot summer night is warm bread.  However, there’s something about bread being comforting on a cold winter night.

ArtisanNoKneadCrustyBread

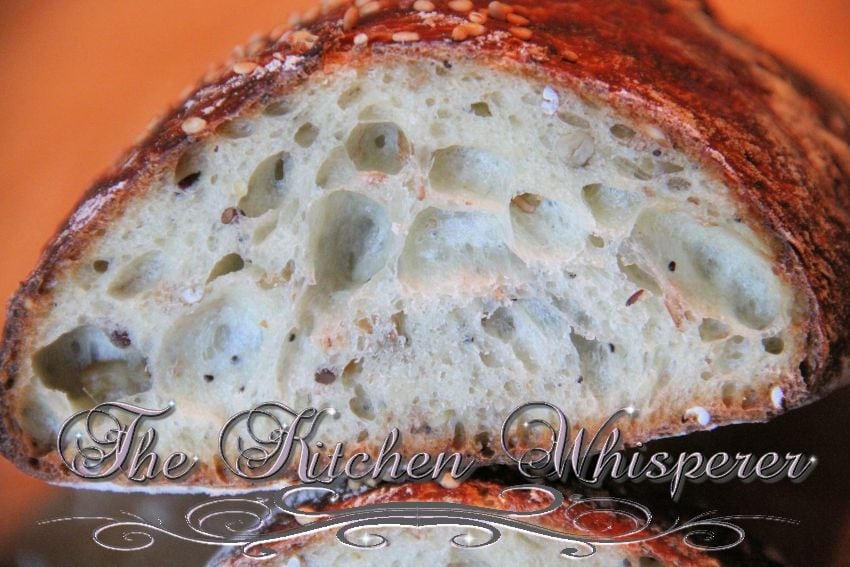
I mean just look at that bread!  1 simple recipe, with a few add-ins, and you have your very own GOURMET Cranberry Almond Citrus Crusty Bread that rivals the best bakeries!

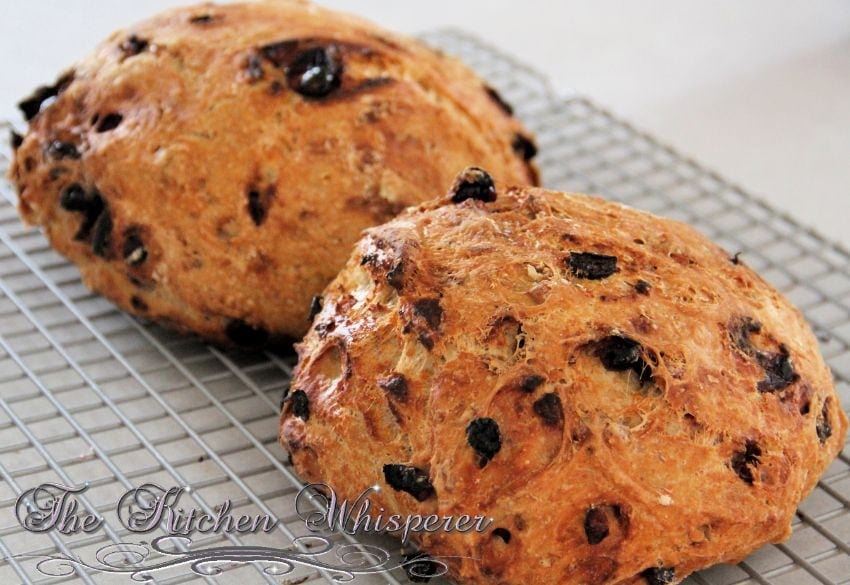
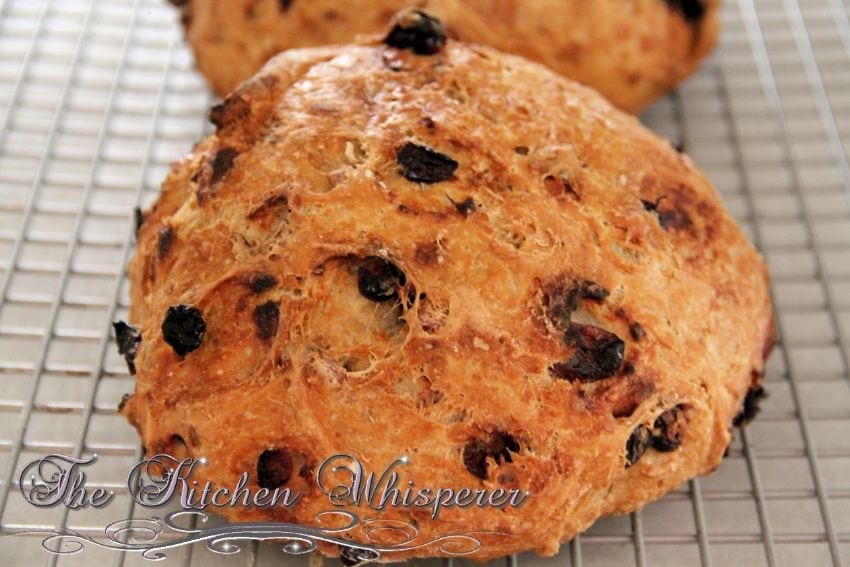
When it comes to bread I go in spurts as to what types I want albeit Brioche, Sourdough, Challah, and so forth. Lately, I’ve been on this HUUUUUUUUUGE crusty and chewy no-knead bread.  Perhaps partly because I was crushed over the holidays with baking so I needed easier stuff to make that just rocked your socks off.  This has quickly become a staple (again) in our house that I make at least once a week.  What I love the most about this recipe is that it’s so simple, so basic that ANYONE can make it (well okay, providing you have the ingredients and a dutch oven/clay baker with lid) and PATIENCE.

Cranberry Almond Citrus Crusty Bread

I’ll share the base recipe however it’s up to you to tweak it with your add-ins.  Don’t be afraid to be adventurous here.  The recipe is very forgiving and you don’t need mad bread baking/shaping skills either.

Cranberry Almond Citrus Crusty Bread1

BUTTTTTTTTTTTTT wanna know the best part out of all of this?!?!  You DON’T need a stand mixer!  No dough hook, kneading by hand as your grandma did – just a wooden spoon, a big bowl, and love *yes, you NEED love when you bake!*

See.. 1 recipe and you can turn it into a Hearty Grain Crusty Bread.  Just LOOK at those holes!

HeartyGrainNoKneadRusticCrustyBread2

And if you just want to kick it up a bit, add roasted garlic and parmesan cheese right before you shape it!

How To Store Your Bread

Fresh, homemade bread has no preservatives or chemicals, unlike the ones you buy in the store. So when it comes to homemade bread, I tend to rely on storing it so it stays moist and tender on the inside. The crispiness you can always fix from reheating.

  1. Heavy Boules (round loaves) – If it’s to be eaten in its entirety on the first day, slice it and store it cut-side down on a cutting board. That will typically help keep it fresh for the day.
  2. For 2-3 days – store it in plastic wrap snuggly. Commercial food-safe plastic bags work as well (like the kind you get at the bakery). I will also use my Emile Henry Bread Box as well as I love how that keeps my bread fresh.
  3. More than 4 days – freezer

Reheating Homemade Bread

    For this style of bread, I prefer the following:

    1. Wrap it snuggly in aluminum foil, and pop it into a preheated 350F oven for about 15 minutes (longer if it’s a huge loaf).
    2. Remove it from the oven, and crank the heat to 450F.
    3. Remove the foil and mist the crust of the bread with water.
    4. Pop it back into the oven for a few minutes to crisp up the crust.
    Print

    The Best No Knead Crusty Bread from scratch

    Print Recipe
    Save Recipe Recipe Saved

    5 Stars 4 Stars 3 Stars 2 Stars 1 Star

    5 from 17 reviews

    Whether you’re a novice or experienced bread baker, No-Knead bread is the easiest and one of the tastiest bread you’ll ever make! Just dump in a bowl, mix and let it rest overnight and dump into a dutch oven the next day to bake!  Easy, peasy, delicious!

    • Author: The Kitchen Whisperer
    • Prep Time: 10
    • Cook Time: 40 minutes
    • Total Time: 50 minutes
    • Category: Bread
    • Method: oven
    • Cuisine: bread

    Ingredients

    • 3 cups bread flour
    • 1/2 teaspoon instant yeast
    • 1 1/2 teaspoon table salt
    • 1 1/2 – 1 3/4 cups water (room temp)
    • Lidded cast iron dutch oven or clay dutch oven/pot – see note if you do not have one of these!
    • Any add-ins you want (nuts, dried fruits, cheese, spices etc…)

    Instructions

    1. In a large bowl add in the flour, yeast and salt. You need to make sure the bowl is at least 2 times the size as this will easily double in volume. Whisk to combine. Add in the water and mix with a wooden spoon – do NOT use a stand mixer. Mix it until it’s combined and forms a ‘shaggy’ dough. Just make sure that all the flour is incorporated. It will not be a smooth dough – that’s how it’s supposed to be.
    2. Cover with plastic wrap and set in a warm place overnight for at least 12 hours but no more than 24.
    3. When you’re ready to bake, put the rack in the middle and preheat to 450F. When the oven reaches temp, put your dutch oven pot (cast iron or heavy ceramic {check to see that your ceramic can handle 450F temp first!}) in the oven WITH THE LID on. Let it heat up for 30 minutes.
    4. While that’s heating up, use a dough scraper and scrape your dough onto a heavily floured surface (or you can flour parchment paper and put it on there). *See note
    5. If adding nuts, fruits, etc, add it now and gently knead in to disperse. Shape into a ball, tucking the sides under. It will be sticky but that’s good.
    6. Cover lightly with plastic until the 30 minutes is up.
    7. Remove the pot from the oven, place the ball dough on floured parchment paper and plop the ball down in the pot. You’re essentially placing the whole thing inside (try to remove the excess flour) the pot – parchment paper with the dough ball.
    8. Replace the lid and bake for 30 minutes. No peaking! Remove the lid and bake for another 15 minutes. Remove from the oven and using tongs remove the bread and cool on cooling rack.

    Notes

    If you’re not comfortable with shaping the dough, when you remove the pot from the oven after 30 minutes you can carefully just pour the dough into the pot. It won’t be a perfectly round bread loaf but that’s okay – it’s just rustic. If you do pour it in, just jostle the pan around to kind of even out the dough before putting the lid on. But practice with shaping the dough. You can’t screw it up.

    Don’t have a dutch oven or clay pot? Never fear! Grab your cast iron pan instead! If you don’t have a cast iron pan, you can use the following:

    Clay pots with lids, Pizza stone with a bowl to cover the bread, insert from a crockpot, pyrex baking dish with a lid, stainless steel pot with a lid, baking dish covered with aluminum foil, old cast iron dutch oven. Essentially ANYTHING that can withstand the oven heat and time!
    1. Take a 12″ round cast iron pan (with preferably a 2-3″ side wall) and place that into your 450F degree oven (just like the directions on the site). This pan will go on the middle rack.
    2. WHILE you are heating that up, place a metal pan on the lowest shelf/rung in the oven at the same time. I just use an old cake pan that has seen better days.
    3. When you remove the VERY HOT skillet from the oven and put your dough in it (have the dough resting on parchment paper so the bottom doesn’t get that ‘black’ color from the pan).
    4. AND as soon as you put it in the oven put about 3 cups of ice cubes in the hot baking pan. DO THIS FAST as you want to trap the steam in the oven!
    5. This will create steam (just like a dutch oven).
    6. After 30-35 minutes check the bread. It should be done but if it’s not cook for 10-15 min more. If at 30 minutes it’s getting dark but not done (will sound hollow when tapped), just tent some foil over top for about 10 minutes.
    7. Cool as normal.

    Made this recipe?

    Tag @thekitchenwhisperer on Instagram and hashtag it #thekitchenwhisperer

    Save For Later!

    Make it a meal!

    Pairs Perfectly With:

    • Mom’s Best Sunday Pot Roast with Savory Onion Gravy Made Easy

      Mom’s Best Sunday Pot Roast with Savory Onion Gravy Made Easy

    • Herbaceous Tuscan Herbed Dipping Bread Oil

      Herbaceous Tuscan Herbed Dipping Bread Oil

    • Easy One Pot Rustic Corn and Cheesy Potato Soup

      Easy One Pot Rustic Corn and Cheesy Potato Soup

    Leave a Reply Cancel reply

    Your email address will not be published. Required fields are marked *

    Recipe rating 5 Stars 4 Stars 3 Stars 2 Stars 1 Star

    78 responses

    1. Deb
      October 13, 2017

      I used instant yeast for this recipe however the package says quick rise instant yeast! Is that ok to use! It turned out awful! Also the clay pot maker stated to place in cool oven and bring to temp however you say preheat the clay pot! I am confused apparently!

      Reply
    2. Deb
      October 12, 2014

      I’ve made this a few times now. We love the flavor but it tends to be soggy in the center. I’m using a quick rise instant yeast….could that be the problem?

      Reply
      1. TKWAdmin
        October 12, 2014

        Hi Deb!

        You cannot substitute quick rise/rapid rise yeast for instant yeast. This yeast has also been milled into smaller particles so that it doesn’t need to be dissolved into water. In addition, enzymes and other additives are included to make the dough rise faster. With this yeast, you can skip the first rise of the dough and shape the loaves right after kneading.

        What you save in time, you lose in flavor and structure. Since it behaves so differently, this yeast cannot be substituted for either active dry or instant active dry yeasts.

        Also are you baking it long enough or better yet, is your oven truly at 450F? The bread, when done, should have a hollow sound when tapped. If it’s soggy in the middle it wouldn’t sound hollow.

        Best Kitchen Wishes!

        Reply
    3. Howdy Doody
      March 14, 2014

      I have 2 10.25 skillets (1 cast iron and 1 heavy non stick which can withstand 500 oven temp) can I divide loaf and how long to bake? Same temp? Thank you very much. Can’t wait to try.

      Reply
      1. TKWAdmin
        March 14, 2014

        How high are the side walls? You really need them to be at least 2-3″ deep. Look at the notes in the recipe as I’m assuming they don’t have a domed lid.

        I would go with a single high-walled pan – again, if you’re going with 1 pan here, make sure it’s at least 3″ deep otherwise it may not cook properly. Meaning it could spill over while cooking or not cook evenly. If you divide into 2 loaves and use both pans, it will work but the bread may not be super high like it would be in a single 12″ pan. I’d still go with the 30 minutes and the recommendations in the notes below.

        Let me know what approach you went with!

        Best Kitchen Wishes!

        1. Take a 12″ round cast iron pan (with preferably a 2-3″ side wall) and place that into your 450F degree oven (just like the directions on the site). This pan will go on the middle rack.
        2. WHILE you are heating that up, place a metal pan on the lowest shelf/rung in the oven at the same time. I just use an old cake pan that has seen better days.
        3. When you remove the VERY HOT skillet from the oven and put your dough in it (have the dough resting on parchment paper so the bottom doesn’t get that ‘black’ color from the pan).
        4. AND as soon as you put it in the oven put about 3 cups of ice cubes in the hot baking pan. DO THIS FAST as you want to trap the steam in the oven!
        5. This will create steam (just like a dutch oven).
        6. After 30-35 minutes check the bread. It should be done but if it’s not cook for 10-15 min more. If at 30 minutes it’s getting dark but not done (will sound hollow when tapped), just tent some foil over top for about 10 minutes.
        7. Cool as normal.

        Reply
    4. Eileen
      August 3, 2013

      So’kay….found it on line…I didn’t really expect an answer late Saturday night.

      Reply
    5. Eileen
      August 3, 2013

      Re the Almond, Cranberry Citrus Bread…can you tell me the typeof almond: chopped or sliced, etc and what citrus? I want to make this and bring to work.
      Thanks,
      Eileen

      PS Toasted my chive black pepper bread and topped with Gorgonzola….With a glass of white wine…soooo good.

      Reply
      1. TKWAdmin
        August 4, 2013

        For the almonds I used chopped though you could easily use sliced. I wouldn’t use whole as I’d be afraid someone would chip a tooth biting into something that big. The citrus I used Flora di Sicilia extract, a tsp of orange zest and tsp of lemon zest. Those both compliment the cranberries VERY well.

        Take a pic of your breads and post them to our Facebook wall! I, along with the rest of the TKW Family, would love to see your creations ESPECIALLY when you make your own; i.e., the chive black pepper Gorgonzola!

        Best Kitchen Wishes!

        Reply
    6. Eileen
      August 2, 2013

      Thanks for this recipe…great crust and so easy. I added snipped, fresh chives and coarsely ground black pepper. The hardest part?: getting the 20 ton dutch oven in and out of the oven. When you add dried fruit like the cranberries, do you hydrate them first or add them as is? Thanks again.

      Reply
      1. TKWAdmin
        August 2, 2013

        Hi Eileen,

        You are most welcome! Yep, this is the most simplest bread recipes ever! Oh… the fresh chives and pepper sounds awesome! Yeah, the dutch oven are heavy to say the least.

        No, I don’t hydrate them; just them in as is. If you hydrate them the bread tends to be “too” wet.

        Have you tried the other No Knead recipes yet?

        Cheddar Chive Garlic Ale – https://www.thekitchenwhisperer.net/2013/06/29/awesomest-cheddar-chive-garlic-ale-crusty-no-knead-buns/

        Awesomest Double Chocolate Chunk Crusty No Knead Bread https://www.thekitchenwhisperer.net/2013/05/12/awesomest-double-chocolate-chunk-crusty-no-knead-bread/

        Best Kitchen Wishes!

        Reply
    7. Gene Peters
      July 8, 2013

      I can make toast and Koolaid, but I’m not a baker. My wife talked me into trying this protocol. It came out absolutely the most awesomest,custy, no knead bread, ever! The loaf looked exactly like the one pictured above for all 10 minutes of it’s life. What a blast. Thanks.

      Reply
      1. TKWAdmin
        July 9, 2013

        Gene you just made me giggle like a little kid with your Koolaid and toast comment! LOVE IT! I’m THRILLED to hear that this turned out awesome for you! I keep telling people that if you’ve never made bread or if you’ve tried and it’s failed, this bread is truly the easiest bread ever!

        Thank you wife for me to talking you into it! 🙂 Keep it up!

        Best Kitchen Wishes!

        Reply
    8. Sue
      January 22, 2013

      Well….I could have screwed that up good huh??? 😉 Aren’t you glad I asked first…;)
      Thanks for clearing things up. I was just nervous about messing up another heavy duty Dutch Oven. I’m still stuck with burnt on Wheat Bran from The NY Times recipe from years ago….;)
      Dough is ready to wait it’s 12 hours now….I’ll let you know….;)

      Thanks again!!!!!

      Reply
      1. TKWAdmin
        January 23, 2013

        Don’t get me wrong Sue, just like baking in any dutch oven/clay pot it gets dirty but you won’t ruin it. Again if you’re unsure go with the parchment.

        I can’t wait to see how yours turns out!

        Best Kitchen Wishes *hugs*

        Reply
        1. Sue
          January 25, 2013

          hehehehe…Burnt wheat bran DOES ruin a good dutch oven…;) That stupid NY Times/Martha Stewart version was just pure evil….;) Burnt beyond burnt….;) I think it’s out in the north 40 with a toilet and a bathtub to hold plants (weeds)…;)

          Reply
          1. TKWAdmin
            January 25, 2013

            Aw Sue 🙁 I can’t believe that recipe of hers ruined your pan 🙁

            Reply
            1. Sue
              January 27, 2013

              hehehehe…..trust me, the pan was ruined. And…I followed it to the letter…I even had a thermometer in my oven at the time so I know it was at the right temp…plus everything else always came out baked to perfection. It was the wheat bran….it just burnt and became permanently part of the inside coating of the dutch oven…;) I SHOULD have put a layer of parchment paper down before adding the bran and then the bread ball but….it don’t even remember having any laying around at the time. I don’t think it was used as much then as it is now maybe??? Who knows…..but I have learned from that experience….;)

              Reply
    9. Sue
      January 22, 2013

      Ok honey….questions already…;)
      Line 10. Shape into a ball, tucking the sides under. It will be stick but that’s good.
      You mean stiff instead of stick right???
      Should we oil the casserole dish before placing the dough into it? What about a piece of parchment paper, cut to the size of the casserole? I suppose that would be ok since your step 9 says that’s an alternate way to do this.
      I’m just so excited to try this…I wanna’ do it right…;)

      Hugs and talk to you later.

      Reply
      1. TKWAdmin
        January 22, 2013

        Hey Sue,

        Line 10 – I fixed it. No, it should be ‘sticky’; tacky like. It’s a wet dough with a higher hydration percentage. Thus is why I say to heavily flour your board. You don’t want it caked on but you want enough so it won’t stick completely to the counter/surface.

        NO NO NO no oil, no nuffin. Trust me on this. If you’re leery about it, put the dough on floured parchment paper and then plop the whole paper/dough down inside but please be careful not to burn yourself.

        As for the size of the parchment paper, I have 16×16″ squares and 16×24″ pieces. You don’t have to cut it you just need to make sure it has a long enough sides (if you’re using it) that you have a good 3-4″ extra all around to plop it in without burning yourself.

        Let me know if you have any more questions.

        Best Kitchen Wishes! 🙂

        Reply
    10. Mary-Alice DeSpain
      January 22, 2013

      TKW,

      You had me at No Knead! I have been waiting for this recipe to appear ever since you posted the pictures of it on Facebook. Love to make homemade bread and this sounds easy peasy! Can’t wait to try it.

      Reply
      1. TKWAdmin
        January 22, 2013

        Mary-Alice,

        You are going to LOVE LOVE LOVE this! Definitely post a pic of your bread on our Facebook page and tell us how you made it your own!

        Best Kitchen Wishes!

        Reply
    1 2 3 … 6
    Newer Comments→

    Welcome!

    I’m Lori, The Kitchen Whisperer®! Let me help you tame the kitchen one bite at a time.

    More about Lori

    Let’s be friends

    • Facebook
    • Instagram
    • Pinterest
    • X
    • TikTok
    • YouTube

    Legend


    AF Air Fryer B Base Recipes BBQ BBQ Method FM Freezer Meals IP Instant Pot MP Meal Prep O Oven Method PF Party Foods SC Slow Cooker S Smoker Method

    Deliciousness Delivered.

    Sign up to receive delicious recipes, kitchen tips and weekly menus (bacon, pizza, & BBQ oh my!) straight to your inbox.

    Click to Subscribe
    Text: this week's menu

    Subscribe for delicious new recipes, kitchen tips & weekly menus

    Join the TKW Family

    What’s trending on TKW

    • Best Super Soft and Chewy Hoagie Rolls
    • Mom’s Classic Easy Stuffed Cabbage Rolls – The Best Recipe!
    • The Ultimate Slow Baked Boneless Short Ribs Recipe
    • Authentic Belgian Waffle Recipe
    • Best Ever Pork Roast and Sauerkraut
    • Nonna Approved Authentic Italian Wedding Soup
    • The Best Portabella Mushroom Veggie Burgers
    • 50 Easy Meatless Recipes for Lent
    • Easy and Juicy Cornish Game Hens
    Back to Top
    Recipe Index
    Instagram feed
    Contact
    Terms & Conditions
    Privacy Policy
    • Facebook
    • Instagram
    • Pinterest
    • X
    • TikTok
    • YouTube
    • Amazon