No Preheating and No Kneading make this THE BEST (and easiest) No-Knead Onion Bread!
This post is being sponsored by my friends at Emile Henry USA featuring their beautiful Bread box. As always, all opinions my own. Thank you for supporting partnerships with brands I trust and believe in.
I. LOVE. BREAD! Nothing beats fresh, warm bread straight out the oven. That smell is just pure comfort and reminds me of home each and every time!

No-Knead Bread is The Easiest Bread to Make!
For as long as I’ve had my Facebook page and Facebook group, the number one thing folks always ask for help on is making bread.
I think what folks are still a tad scared of is working with yeast. This is why I ONLY use Red Star Yeast. I’ve been using them for decades and they are THE BEST out there.
I have never ever had an issue with their yeast and my bread and baked goods turn out perfect every time!

This bread is pretty foolproof:
- Measure
- Stir/Mix
- Cover overnight
- Shape
- Bake
There are no kneading or machines needed.
Chef’s Tip about No-Knead Bread and Yeast
Normally working with yeast you have to proof or bloom it. In No-Knead bread you don’t have to.
And because the dough rises on the counter/warm area overnight, you actually use less yeast in this type of bread.
As the bread proofs overnight, it will also create natural yeast to help with the proofing.
Trust me, you GOT THIS!

Ingredients To Make Onion Loaf Bread
These should be ingredients you have on hand.
- Bread Flour – you want bread flour as that has a higher protein count which makes the bread chewier
- Instant Yeast – I only use Red Star Platinum Instant Yeast
- Kosher salt
- Onion – granulated onion and dried minced onions
- Water

Using Fresh Onions
You can use fresh onions BUT you need to do a couple of things first:
- They must be cooked completely and cooled.
- You will still need to add granulated onion
- You will need to add the cooked onions after it has proofed overnight. See this post about how to add items to your dough.
- Essentially, once you pat out the dough you’ll want to place the cooked and cooled onions into the dough, roll it up, close the seams, and gently work it into the dough.
- Once you do that, then you’re ready to fold, etc…

Let’s Make No-Knead Bread
Now you’ll have to plan accordingly as this dough needs to rest on the counter overnight to proof.
- In a large bowl add in the ingredients and whisk to combine. I HIGHLY recommend using a Danish Dough Whisk for this.
- Once it’s all incorporated into a “shaggy” dough, cover and set it in a warm place and allow to proof for at least 12 hours.
- The next day, uncover and punch it down.

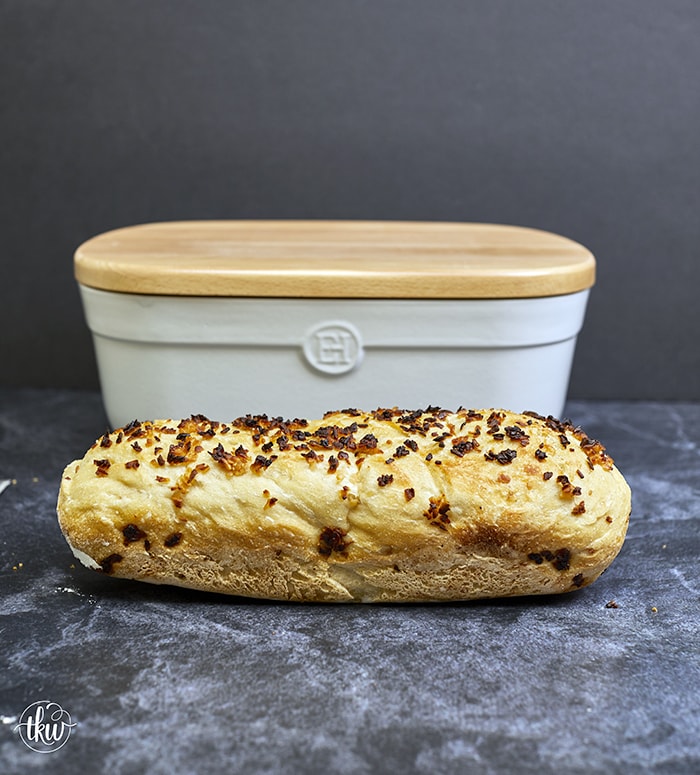
The Emile Henry Bread Box -Yes, you need one!
When I tell you that this breadbox is a must-have, believe me! It’s absolutely GORGEOUS! Plus, just like the rest of the products, it really works!
Their breadbox creates an environment that balances humidity, needed for a soft interior, and provides the air circulation needed to maintain a crusty crust.
It is designed large enough to allow for air circulation, yet it is small enough to fit neatly on a countertop. And since the interior is unglazed, that helps to absorb moisture.
Also, the wooden lid, smooth on the top, is grooved on the cutting side for collecting crumbs when slicing bread.

It’s Time To Shape Up – Your Bread Loaf that is!
- Once you’ve punched down the dough, dump the dough out (a dough scraper will help) onto a lightly floured surface.
- Pat the dough gently into an envelope. If it is super sticky you can add a little flour but try not to add a lot as it affects your dough.
- Gently roll that envelope into a log.
- Fold it again into an envelope.
- You’ll notice that the dough starts to look a bit smoother on the second envelop fold. This is GOOD!

Repeat The Folds
You may be wondering if that’s a typo where I tell you to form into a log, fold into an envelop and form the log again. It’s not.
This is a very rustic way of “layering” your dough. It adds lightness and air into the dough. You can most certainly do this up to 10 times if you wish. I usually do 2-3 times and honestly, it depends on the dough and how it feels.
-
- Form the dough into a log again and pinch to seal the seams. For the ends, just tuck under and pinch them to seal against the bottom. The loaf should be ~12” long and ~4” wide. It should just fit into the pan.
- Right before placing the dough into the Emile Henry Italian Loaf Bread Baker sprinkle in a tablespoon or two of flour in the bottom to help the dough remove easily after baking.
- Place the dough in, add the rehydrated onions on top and put the loaf cover on top.
- Set the baker off to the side as the bread needs to proof for 30 minutes while the oven heats up.
- Once it’s ready to bake, add the covered pan to the oven and bake per the directions.

The smell of warm, fresh, bakery-style bread at home!
Baking this bread is so easy and oh folks the smells that will come from your oven are incredible!
After a 40 minute covered bake and a 15-20 minute bake without the cover (this helps with browning and coloring), the baker is removed from the oven and the bread is turned out onto a cooling rack.
The biggest thing I recommend when making bread is to test the internal temperature. Just like when you make chicken or beef, bread has a doneness temperature too – 200F. I use this thermometer.

No Need To Preheat!
Yes, you read that right! You do not have to preheat your baking vessel (in my case the Emile Henry Italian Loaf Baker) or your dutch oven!
For years the rule of thumb was that you had to preheat your dutch oven or baker for at least 30 minutes BEFORE your baked your bread. All of my previously published recipes tell you to do this. There’s nothing wrong with doing it, to be honest. There is a very slight difference in the outcome between preheating and not but I’ll get to that in a second.

I’m friends with several bread bakers throughout the world and we all started to notice that folks were well, rewriting the rules. That you didn’t have to preheat your pan but that you could put your loaves in a cold pot and bake away.
I tested this out not only on this recipe but my other no-knead ones and…
IT WORKS!
Preheat vs Cold Pan, is there a difference?
As I said, I noticed a very slight difference. I would say that most folks wouldn’t notice but since I bake bread daily I’m a more tuned in if you will.
What I noticed is that when you use a preheated Dutch oven (*Note do not preheat the Emile Henry product – this is more for the dutch oven method), you will get a super hard crust on the outside.
When you use a cold pan (either the baker or a dutch oven), the crust will still be hard but not rock solid. Now, it will crisp up more as it cools down. It’ll still be crusty bread but not super crispy/crunchy like the preheated pan would be.
Honestly, I think from now on I’ll use the cold pot method as it removes the risk of getting burned.

Built-in Cutting Board!
One of the 9 million things I LOVE about this Bread box is that the cover, flips over and you have a built-in cutting board! You can make perfectly even cuts as thick or thin as you want!
The thinner slices are perfect for crostini (which this bread is AMAZING as). The thicker makes for killer sandwiches!

How to use a Dutch Oven for No-Knead Bread
While I think everyone needs the Emile Henry Italian Loaf Baker you may not have one…yet (put it on your wish list folks!) you may be curious how to make this in a Dutch oven.
You need 2 things:
- 6 quart lidded Dutch Oven
- Parchment paper
When the dough has finished proofing, you’ll still need to gently shape the dough into a tight ball.
- Gently turn/scrape the dough out onto a lightly floured work surface.
- Start to pull all 4 sides of the dough into the center and gently pressing to seal.
- Next, pull the dough all into the center. Essentially you’re folding the dough into itself to help form a tight ball.
- Flip the dough over on to the part of your work surface that isn’t covered with flour.
- Cup your hands around the dough and start to turn the dough and pull it towards you. Repeat this until it forms a tight ball.
- If this is too hard, put your hand over the top of the dough ball and gently started to roll it under your hand. It should start to form a ball as you roll the dough around in a circle.
- Place the dough on lightly floured parchment paper and place the parchment paper into the dutch oven.
- Make sure you have enough overhang of the parchment as you’ll need that to lift the bread out of the pan when it’s done baking.
- Cover the Dutch oven with the lid and set aside while the oven preheats.
- Bake as the directions state below.

Ways to Use Onion Loaf Bread
- Sandwiches – elevate your ham & cheese or turkey & swiss!
- Dinner – this is amazing served warm with butter with pot roast, pasta, and chicken!
- Mini Pizza slices – Slice, cover with sauce, cheese, and toppings and bake at 400F for 10-15 minutes or until the cheese is bubbly!
- Croutons – Cube up the bread, toss the cubes with 3 tablespoon olive oil, 2 tablespoon melted butter, 1 teaspoon each of garlic powder, oregano, and basil plus 1/2 teaspoon each of kosher salt and pepper. Bake in a preheated 375F oven for 15-20 minutes tossing halfway through.

How do you store your bread?
Your belly… *smile*
For the longest time, I stored my freshly baked bread in a paper bag or wrapped tightly in plastic wrap followed by a plastic bag.
However, when I saw the Emile Henry Bread Box I was smitten.
Not only is it gorgeous, but it’s also THE PERFECT item to store your bread in.

- Put bread in the box
- Close the lid
- Enjoy your bread within a few days

That’s it! No wrapping or anything. It truly does keep your bread fresh
How To Freeze Bread
If it’s just you OR you go on this mad bread baking frenzy and have more loaves than friends, you can easily freeze freshly baked bread.
Entire Loaves
- Allow the bread to cool completely.
- Double wrap in plastic wrap and then place in a freezer-safe plastic freezer baggie.

Sliced Bread
- Slice the bread and place a piece of parchment paper between each slice.
- Double wrap the bread in plastic wrap and then place in a freezer-safe plastic freezer baggie.

How to Reheat Frozen Bread
Sliced Bread
- I tend to just stick it in the toaster frozen (once unwrapped) for toast
- For sandwiches, allow it to thaw in the fridge overnight.
Whole Loaves
- Thaw in the fridge overnight, while still wrapped.
- The next day, preheat the oven to 350F,
- Once it’s to temperature, unwrap the loaf and lightly run it under cold water (VERY QUICKLY).
- You just want to lightly spritz the water over the entire loaf with cold water. The light coating of water will steam in the oven giving you a crisper, fresher crust.
- Place the bread loaf directly on the oven rack and bake for 15-20 minutes or until the crust is crisp again and the crust just lightly cracks when you press it.
- Remove from the oven and allow to cool completely before slicing.

Want more delicious bread and dough recipes?
- Artisan Cranberry Pistachio Chocolate Chip Bread
- Cheesy Bacon Ranch Chicken Braided Bread
- Everything Bagel Ham & Cheese Sweet Rolls with Dijon Glaze
- Hand-tossed Neapolitan Pizza Dough
- No-Knead Orange Cranberry Raisin Bread
- The Best Pizza Dough
- My World Famous Soft & Chewy Hoagie Rolls
The Easiest & Tastiest No Knead Onion Bread Loaf

No Preheating and No Kneading make this THE BEST (and easiest) No Knead Onion Bread!
- Prep Time: 15
- Cook Time: 1 hour
- Total Time: 1.25 hours
- Category: No Knead
- Method: Oven
- Cuisine: Bread
Ingredients
- 3 cups bread flour
- 1/2 teaspoon Redstar Platinum instant yeast
- 1 1/2 teaspoon kosher salt
- 1 1/2 cups water (room temp)
- 1 1/2 teaspoon granulated onion
- 2 tablespoon plus 2 teaspoon dried, minced onions, divided
- 2 teaspoon hot water
Instructions
- In a large bowl add in the flour, yeast, granulated onion and 2 tablespoon of dried onions, and salt. You need to make sure the bowl is at least 2 times the size as this will easily double in volume. Whisk to combine. Add in the water and mix with a wooden spoon – do NOT use a stand mixer. Mix it until it’s combined and forms a ‘shaggy’ dough. Just make sure that all the flour is incorporated. It will not be a smooth dough – that’s how it’s supposed to be.
- Cover with plastic wrap and set in a warm place overnight for at least 12 hours but no more than 24.
- When you’re ready to bake, preheat your oven. Put the rack in the middle and preheat to 450F. Let this heat up for about 45 minutes.
- Mix the remaining 2 teaspoon of dried, minced onions with 2 teaspoon of hot water. Gently stir and set aside. Place the dough out a lightly floured board and gently shape it into a rectangle ~12×8”. Fold one third over and the other third on top (like an envelope). Gently start to roll it with your hands into a log that’s ~12×4”. Pinch the seams together. For the ends just tuck them under and pinch to seal. *See note if you’re not using the Emile Henry Italian Loaf Bread Baker about shaping and baking in a Dutch oven.
- To the Emile Henry Italian Loaf Bread Baker, sprinkle in a tablespoon or two of flour in the bottom to help the dough remove easily after baking. Place the loaf in the baker. Take the re-hydrated dried onion mixture and sprinkle on top of the loaf. Cover and set aside while the oven heats up.
- Right before putting your bread in the oven, turn the temperature down to 425F, put the loaf pan into the oven (covered) and bake for 40 minutes, remove the lid and bake for another 15 or until golden brown and the internal temp reaches 200F.
- Remove from the oven and carefully empty the loaf onto a cooling rack. Allow to cool before slicing.
- Store the bread in the Emile Henry Bread Box. It will stay fresh for ~3-5 days.


Leave a Reply