


Posts may contain affiliate links that help enable me to continue to provide you with free recipes. As an Amazon Associate, I earn from qualifying purchases. Please see my Privacy Policy for further details.
Foolproof focaccia topped with Everything Bagel seasoning, minced Garlic, and Oregano. A soft and delicious bakery-style bread from scratch that is effortless and delicious!

One of the most often questions I get asked/emailed/DM’d about is making bread from scratch. Where does a novice bread baker start? What type of flour to use? Kneading, folding, proofing… And yeast, apparently yeast scares people.
Well, fear not folks, I can help you with this and help you conquer your fears. No-Knead Bread is the EASIEST yeast bread to delve into making.

I was fortunate in that I was very little when my Mom taught me how to make bread from scratch. She taught me to never fear yeast or dough. Mistakes can happen but you can learn from your mistakes.
The easiest way to venture into bread baking is by making a No-Knead bread. It’s:
- No-fuss – just measure the ingredients and dump them into a bowl/bucket
- No mixer – just use a wooden spoon or a Danish Dough Whisk to quickly mix it up
- Set it aside – just cover it with plastic wrap or a lid and let it rest overnight for 12-24 hours
- Shape – this again just requires you to take it out of the container and barely dough it. In this case, you’re pretty much just taking it from the bucket to the pan
- 2nd Rise – cover and let it rise again
- Top & Bake – Top with whatever your heart desires and bake
Ingredients Needed
- Bread Flour – it will give it a lighter, chewier texture
- Yeast – Active Dry or Instant
- Salt – kosher or sea salt
- Water
- Olive Oil
- Toppings – in this case, fresh garlic, everything bagel seasoning, dried oregano, and optional cheese
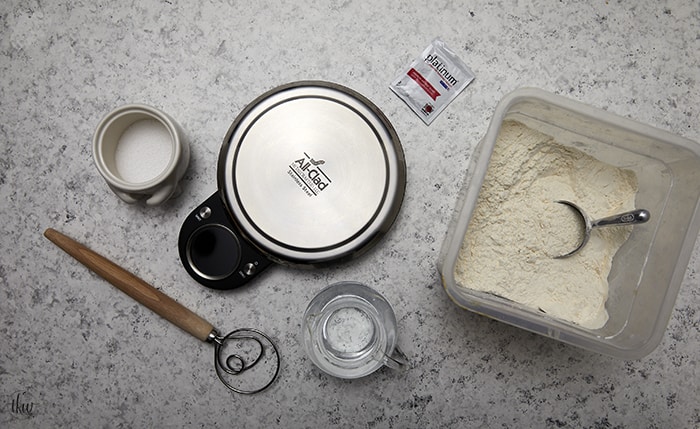
Equipment Needed
- Food Scale – you should always measure your baking ingredients (especially bread) with one
- Large Container – I use this 6-quart bucket with a lid
- Utensil for Mixing – I swear by my Danish Dough Whisk
- Pan – I use a 16×12 inch pan though you can use a rimmed half sheet pan ~18×11”

Let’s Make No-Knead Focaccia Dough!
- Grab your kitchen scale and place your bucket or bowl on it. Once the weight displays hit “TARE” or “ZERO”
TARE a Scale
To TARE or ZERO, a scale means that you are taking the displayed weight back to 0. So when I put the bucket on below, it displayed the weight of the bucket. To get an accurate reading, I hit the ZERO or TARE button. It then will display the weight, even with the bucket on it, to zero.
I do this after the addition of every ingredient. I do this for all doughs. You should too!

- To the bucket add the flour until the weight reads 650 grams.
- TARE/ZERO it out and then add in the salt. TARE again. Using a wooden spoon or whisk, mix the 2 ingredients.
- Next, add in the water, TARE the scale, and add in the yeast.

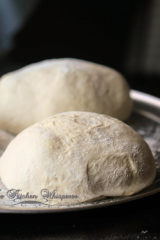
- Remove the bucket from the scale and mix/whisk until it’s all combined and forms a “shaggy” dough. Just make sure that all the flour is incorporated.

As you can see it will not be a smooth dough; you do not want that.

- Cover the bucket with a lid or plastic wrap and set it in a warm dry place for at least 12 hours or overnight. Do not let it go more than 24 hours.
I’ve found that my “sweet” spot is 18 hours. As you can see the dough becomes more supple and airy.

Prep The Pan
I use my “Grandma” pizza pan as I LOVE LOVE LOVE the LloydPans products. They truly are THE BEST for dough.
If you want to get some amazing pans from them I have a 10% off discount code through their website to use. It’s good for one time only per person so order wisely. If you’re not sure what to get, send me a message and I’ll be happy to help you with pans!
Personal Discount Code: Lori-thekitchenwhisperer10

- Once the dough has been proofed, add half of the olive oil to the pan and spread it out to cover the bottom, corners, and sides.
- Sprinkle the sesame seeds all over *Note if you’re allergic you can totally omit*
- Remove the bread dough from the bowl/bucket and, while still in your hands, gently pull/stretch it to a pseudo rectangle. Nothing major here. You’re just trying to give it a little help in the stretch.
- Place the dough in the middle of the prepared pan and gently pull/stretch the dough out towards the edges. Do not force it to go into place, it will need to relax and will spread out while it rests.
- Lightly spray plastic wrap and place the sprayed sign on top of the dough covering it and the pan. Set aside in a warm, dry area to rise, ~1.5-2 hours.

Focaccia Toppings
The beauty of focaccia is that the toppings for it are pretty limitless. I’d say the most popular is sea salt and rosemary. However, I’m not a fan of rosemary (Too soapish for me). For this one I went with:
- Oregano or Basil
- Fresh Garlic
- Everything Bagel Seasoning
- Cheese – this recipe post doesn’t show it but I often add freshly grated cheese


- Once the dough is all puffy and fills up the pan (it may need a little nudge to get to the edges), preheat the oven, and rack in the middle, to 450 F.
- While the oven is heating, uncover the dough, pour the rest of the oil over top, and, using your fingertips, dimple the dough all over.

- Once fully dimpled, sprinkle on the garlic, everything bagel seasoning, and oregano. If using the grated cheese, sprinkle over top


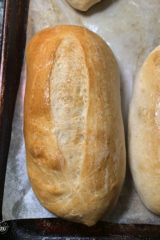
- Bake for 15-23 minutes or until the bread is golden brown and the internal temperature is 200F

GBD – Golden Brown Delicious
Mmmm can you smell that??? It smells like HEAVEN!
- Remove from the oven and immediately remove the bread from the pan to a cooling rack.
- Give it about 10-15 minutes, transfer to a cutting board, slice, and enjoy!
Is it important to remove it from the pan?
You want to immediately remove it so the bottom stays crisp and doesn’t get soggy.

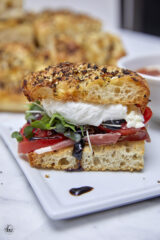
Ways to Serve Focaccia
- Slice and dip into warm herb oil or sauce
- Slice in half, toast, and assemble for an amazing sandwich
- Sliced and served with melted cheese
- On a Charcuterie board
- Mini Sandwiches
- With Hummus or another dip
- Warm from the oven

Storing, Freezing, Reheating Focaccia
Like most bread, it’s best served the day it’s made HOWEVER it’s frowned upon to eat an entire loaf or pan of bread in one sitting.
Store at room temperature in a loosely covered by foil/plastic wrap for up to 2 days.
Slice and freeze in an airtight container for up to a month.
To reheat, place the bread in a preheated 375 F oven for a few minutes. If desired you can also give it a little drizzle of olive oil before reheating.

Focaccia Topping Variations
- Sundried Tomatoes, Olives, Capers, Sea Salt
- Chili Oil, roasted red peppers, green onions
- Garlic oil, caramelized onions
- Tomatoes, basil, chives
- Bread Art – just google how to make focaccia bread art
- Bell Peppers, Mini Tomatoes, Fresh Herbs, Garlic
- Thinly sliced lemon, thyme, capers, and sea salt

Everything Bagel No Knead Focaccia with Garlic & Oregano
- Prep Time: 5 minutes
- Cook Time: 15-23 minutes
- Total Time: 30 minutes
- Category: bread, no need, carbs, sandwiches
- Method: oven, no knead
- Cuisine: bread, no need, carbs, sandwiches
Foolproof focaccia topped with Everything Bagel seasoning, minced Garlic, and Oregano. A soft and delicious bakery-style bread from scratch that is effortless and delicious!

Ingredients
- 650 grams (almost 5 cups) Bread Flour
- 465 grams (2 cups less 2 tablespoons) warm water
- 14 grams of kosher or sea salt
- 4 grams instant yeast (active dry or instant active dry)
- 108 grams (1/2 cup) olive oil, divided
- 3 tablespoons sesame seeds
- 2 tablespoons minced fresh garlic
- 3–4 tablespoon Everything Bagel Seasoning
- 1 1/2 teaspoon dried oregano
- 1/4 cup freshly grated Parmesan cheese *optional
Instructions
- To a large bowl or bucket with a lid, add the flour and salt. Using a Danish Dough Whisk (or wooden spoon) quickly whisk the ingredients together. Next, add the water and yeast. Using the whisk, mix it until it’s combined and forms a ‘shaggy’ dough. Just make sure that all the flour is incorporated. It will not be a smooth dough – that’s how it’s supposed to be.
- Cover with plastic wrap or place the lid on the bowl and set in a warm place overnight for at least 12 hours but no more than 24.
- To a 16×12 inch pan (or a rimmed half sheet pan ~18×11”) add half of the olive oil and spread it out so the bottom and sides are all coated. Sprinkle the sesame seeds evenly over top of the oil. Remove the bread from the bowl/bucket and, while in your hands, very gently form it into a rectangle (it’s okay if you have issues). Place the dough in the middle of the prepared pan and gently pull/stretch the dough out towards the edges. Do not force it to go into place, it will need to relax and will spread out while it rests.
- Lightly spray plastic wrap and place the sprayed sign on top of the dough covering it and the pan. Set aside in a warm, dry area to rise, ~1.5-2 hours.
- Once the dough is all puffy and fills up the pan (it may need a little nudge to get to the edges), preheat the oven, rack in the middle, to 450 F. While the oven is heating, uncover the dough, pour the rest of the oil over top and, using your fingertips, dimple the dough all over. Once fully dimpled, sprinkle on the garlic, everything bagel seasoning, and oregano. If using the grated cheese, sprinkle over top.
- Bake for 15-23 minutes or until the bread is golden brown and the internal temperature is 200F.
- Remove from the oven and immediately remove the bread from the pan to a cooling rack.
- Store at room temperature in a loosely covered by foil/plastic wrap for up to 2 days. After that, slice and freeze in an airtight container for up to a month.
Notes
Time does not include overnight proofing


I made this delicious focaccia bread this weekend with my daughter. We love baking together. We made sandwiches with it and they came out perfectly.
I was so excited when I saw you used marinara to dip this bread in! That’s the perfect way to enjoy freshly baked bread! Love this!
My mouth is watering just by looking at your photos! We love Everything But The Bagel seasoning and of course bread! I love the NO KNEAD part too- I can’t wait to make this over the weekend! Thank you!
Made this for dinner and it was the star of the meal; even over the steak! This could not have been any easier! I threw this all in the bucket last night before bed. This morning I put it in the pan and by lunch time it was ready to be baked.
The kids begged me to eat it for lunch but I had to save it for dinner. I’m making 2 buckets tonight as we ate the entire pan! Thank you for such an amazing recipe Lori!
Great flavors for focaccia! It came out fluffy and delicious… we definitely will be making this one again. Thanks for the great recipe!
I’m a huge fan of focaccia and completely agree on being one of the easiest and most delicious bread! The idea of topping it with everything is genius! Can’t wait to try it. Thanks for sharing.
made it this morning and turned out yummy! Thank you very much for sharing!
This recipe is SPECTACULAR. So many recipes call for different ingredients that just seem to ‘weigh’ the dough down, but this recipe is simple and effective. The toppings were SO good as well. The only difference we made to the recipe was adding EVOO into the bowl during proofing and broiling the top for 3-4 minutes to get an extra golden-brown color. Cannot wait to try this again 🙂 Thanks, Kitchen Whisperer!
I just got a dough hook – do you use it for all things? What should I not use it for, maybe that is an easier question to answer. (You crack me up! Anyone who frowns at me can just avert their eyes! Haha.)
I mean a dough whisk!
Hi Stephanie!
A dough whisk is pretty awesome in the kitchen. Obviously it’s perfect for no knead breads but it’s excellent as well for brownies, muffins, crepes, pancakes, etc…
I wouldn’t use it for cakes or stuff that needs to rise/be aerated (like regular bread that you do not let rise overnight or bread that you knead). Make sense?
Best Kitchen Wishes!
I’ve baked no-knead bread variations for years & they are my default bread. I want to expand my options. Need your advice as to LLoyd Pan sizes. Your focaccia recipe pictures appear to be 12x16x1″ grandma size pans, but you refer to Sicilian pizza pans (which I think are 1.5″ deep). Which style & size do you prefer for the focaccia & for traditional pizza? How high does the focaccia bake up? Your onion no-knead bread recipe won’t open. Can you fix that &/or send me the recipe. Thanks.
Hi Thad,
Thanks for the note about the link to the onion bread. It’s fixed – it was missing a ‘/’ in the URL. I used a Grandma pan for this recipe. I didn’t want it to be too thick. As you can see from the one side picture, it’s just a bit over an inch thick. For me that’s perfect focaccia thickness as I can cut it for dipping or slice in half for a sandwich. It’s not “too” bready.
For the focaccia, I prefer a Grandma pan or if folks don’t have that, a standard half sheet pan. The bread will be a tad thinner on that pan but still equally delicious.
In regards to pizza, what do you consider traditional? I’m assuming you are referring to a “pan” pizza and not a hand-tossed dough. Each style uses a different dough. I have a Grandma pizza recipe on here. Sicilian pizzas are a little different in hydration as well as cook. Those I par-bake whereas a Grandma dough I do not. Detroit dough takes 5 days to cold ferment, way different ingredients/hydration, and uses a specific Detroit pan. Chicago Pizza is a completely different animal too from ingredients, dough, cooking, so forth. However, in any of these pan pizzas, the BEST pans are made by LloydPans. I would say out of all of their pans I own, I use their 12″ & 18″ Long pans (it’s a Detroit-style pan but you can use it for other applications) and their Detroit 10×14″ pan the most. I love that cheesy/crispy crust. On a side note, I also have their cheesecake pan and it is PHENOMENAL!!! It bakes up 4″ tall and truly makes a statement when the cheesecake is unmolded.
Best Kitchen Wishes!