

Grandma’s pie crust recipe is light, flaky, tender, and absolutely delicious using her secret tip that has never failed me!
On my Facebook Foodie Group, so many folks post questions about making pie crusts. They either are afraid to make them, they never turn out, or they taste terrible.
Everyone has their own idea of what makes an amazing pie crust flavor. To me, it should be flaky, flaky, tender with a hint of sweetness. It should taste like a very light pastry.

When it comes to pie crusts, some say it should be all butter while others swear by lard/shortening. I can remember when I was 5 years old in my Grandma’s kitchen a week before Thanksgiving.
She’d have her white flowered apron wrapped around her waist, pink hair (yes my grandma was the OG of cool pink hair!) perfectly done, and a million pie pans ready to go.
I’d be under her feet, begging her to take her other apron and wrap it around my waist and pushing the chair up to the table so I could “help”…or get in her way.
Grandma’s pie crusts were amazing in every single way!
Super Flaky, Tender soft, Crazy easy to make, Blows away any storebought crust, Uses simple pantry ingredients, And has a secret Grandma ingredient – that’s what this recipe is.
Recipe Ingredients
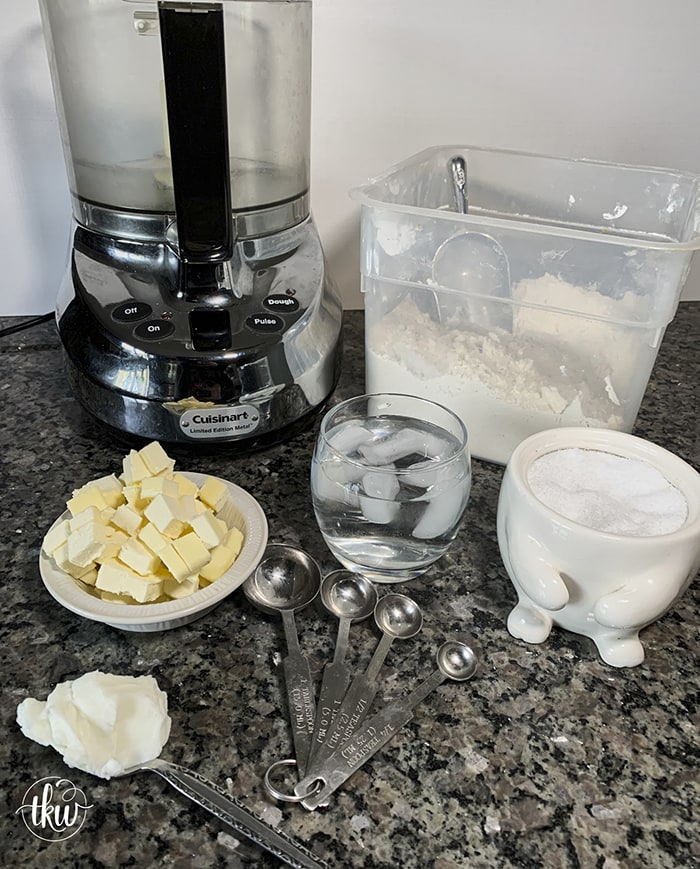
I’m pretty sure you have all of these items in your pantry/cabinets:
- All-purpose Flour – weigh your flour as it’s important. Too much flour and you’ll get a crust that will be dry as the Sahara desert
- Salt – Just like in cookies and cakes, a little bit of salt helps make the flavor of the crust pop!
- Fat – Grandma used a mixture of both butter and shortening. The fats must be cold as this is what helps create little air pockets as the crust bakes thus giving you beautiful flaky layers
- Water – ICE COLD water is a must! Not only does the liquid help create the steam that makes the crust rise and create flakes, but it also helps create just a bit of gluten to allow the crust to stick together. Having it ice cold helps keep the fats more solid.
- Grandma’s Secret Ingredient – Back then it was a coveted secret but nowadays it’s a pretty standard item as well, Grandma’s know best! Vodka at 80 proof AND ice cold. If you don’t have vodka, you can use white distilled vinegar but I’ll be honest, it’s not the same taste and texture as vodka
Vodka in Pie Dough
So booze in the crust, eh? Yep! It’s not to make the pastry boozy per se but rather it all has to do with chemistry.
When you combine a fat with flour in this recipe you want to do your best to not form gluten. Gluten = chewy, tough pie crust. Instead, we want light and flaky. All water in this recipe will allow the flour and fat to combine but it will also hydrate the proteins thus aid in the formation of gluten. Vodka contains ethyl alcohol which won’t attach itself similarly to how water does therefore it won’t help form gluten. But the proof matters here – at least 80 proof.
Could you use all vodka?
You could but I found that the dough didn’t have enough “body” or strength. I like the ratio here as the crust is sturdy but still tender.
Let’s Make This Dough!
Now Grandma used to make her pie dough in a big bowl with her hands then when she got older and her hands became arthritic, she’d use a fork or pastry cutter. Since I’m recuperating from hand surgery, I opted for the food processor.
I’m going to be honest here, I see no discernable difference between using a food processor and a pastry cutter/hands.
BUT…when using a food processor you must watch your dough very closely and not over-process it. If you do, you’ll ruin it.
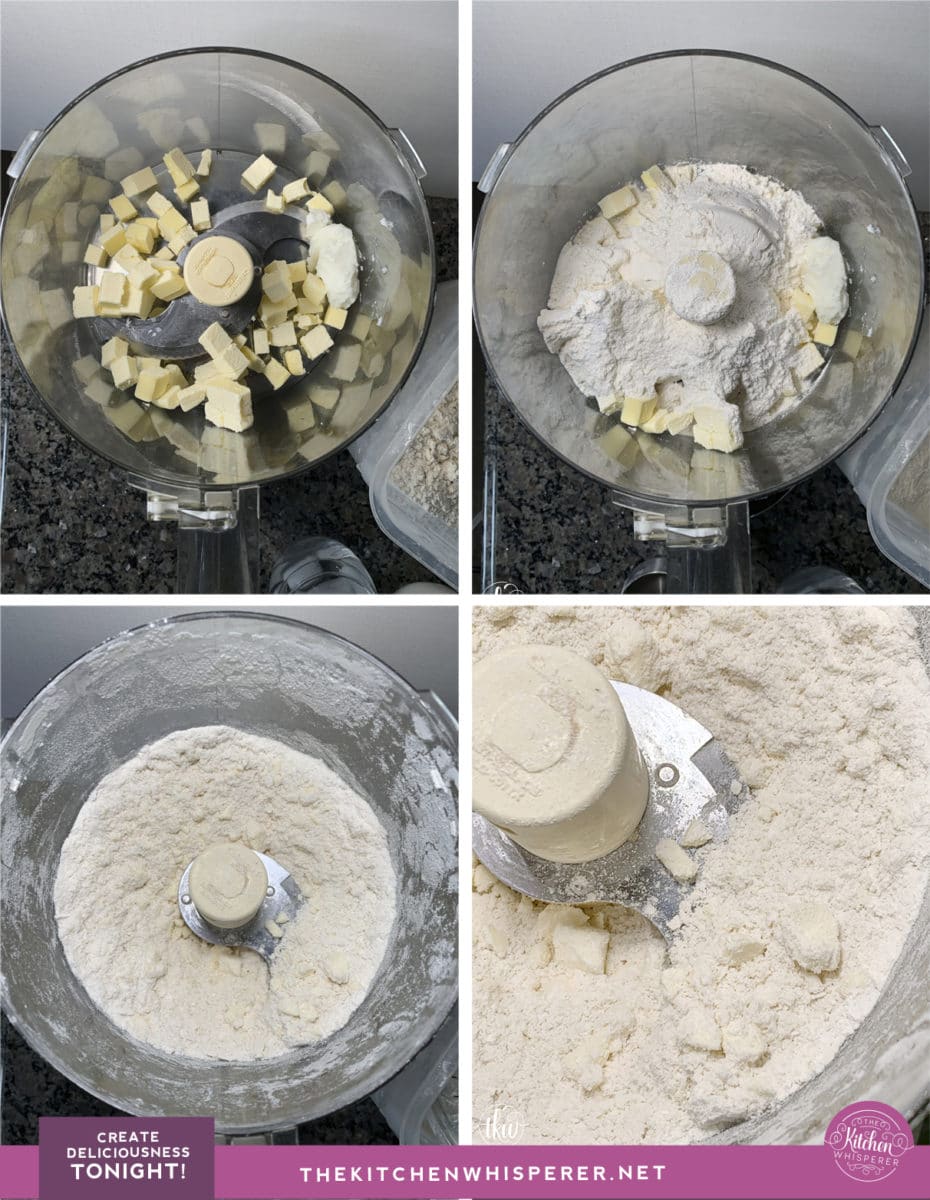
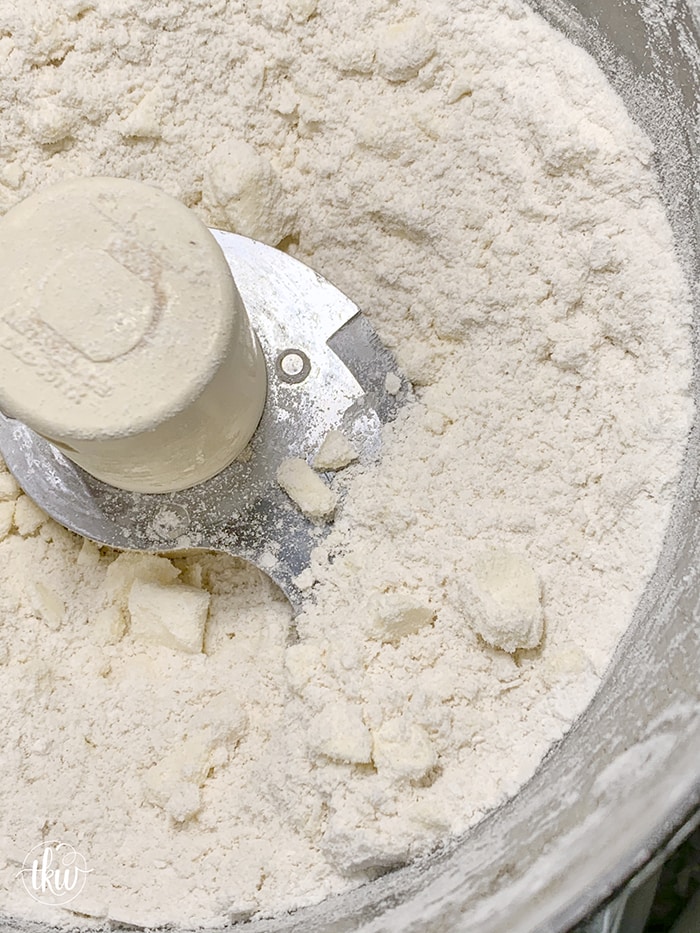
- In a food processor fitted with the dough blade, add the butter, shortening, flour, sugar, and salt. Pulse 8 to 12 times, until the butter is the size of peas.
You want to see those bits of fat. Fat bits are prized here. When the pie crust bakes, the little bit of fat will melt and create little air pockets. Those air pockets are what creates a light, beautiful, flaky crust.
FAT BITS ARE YOUR FRIENDS!
- With the food processor running, pour in the water and vodka (not the ice) until it forms a ball. This should take 10-15 seconds
- *Optional – if you do not want to take it to the ball stage (as this is where you REALLY have to pay attention as you can go too far), once the dough is ‘wet’, you can stop the processor, dump the dough crumbs out onto a floured surface and quickly work to form into a dough ball.
Chef’s Tip about Working With Pie Dough
Try to touch/work the dough as little as you can with your hands.
Hands are warm and can quickly melt those little fat bits in the dough. Remember, fat bits are key here!
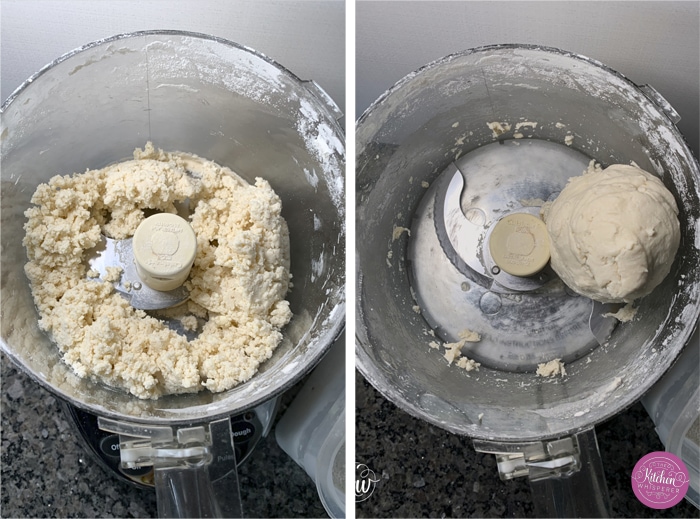
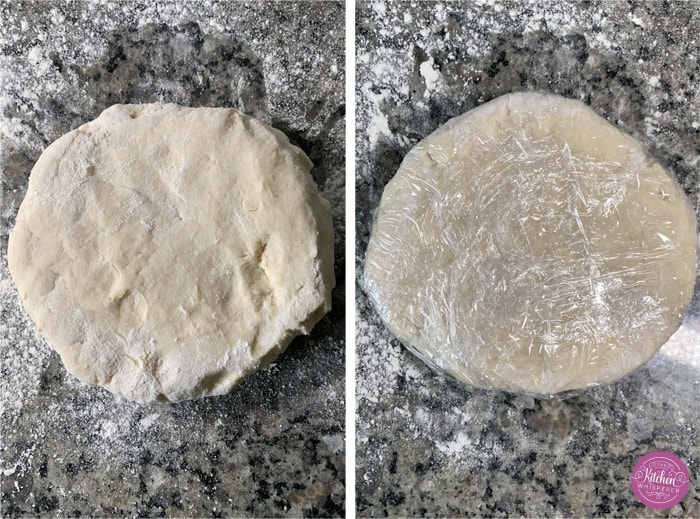
- On a floured surface, dump out the dough crumbs (or ball) and quickly shape into a round disk. Wrap in plastic wrap and refrigerate for 30 minutes.
- Place the chilled dough disk onto a floured surface and starting in the center applying gentle but even pressure, roll towards the end.
- Give it a quarter turn, flour if need be, and roll again. Be sure to lightly flour your rolling pin and counter to prevent it from sticking.
- Roll out to a 12″ diameter. This is what works best for a 9″ pie pan.
- REST! Allow the dough to rest on the surface for 5 minutes. This allows the dough to relax and not spring back.
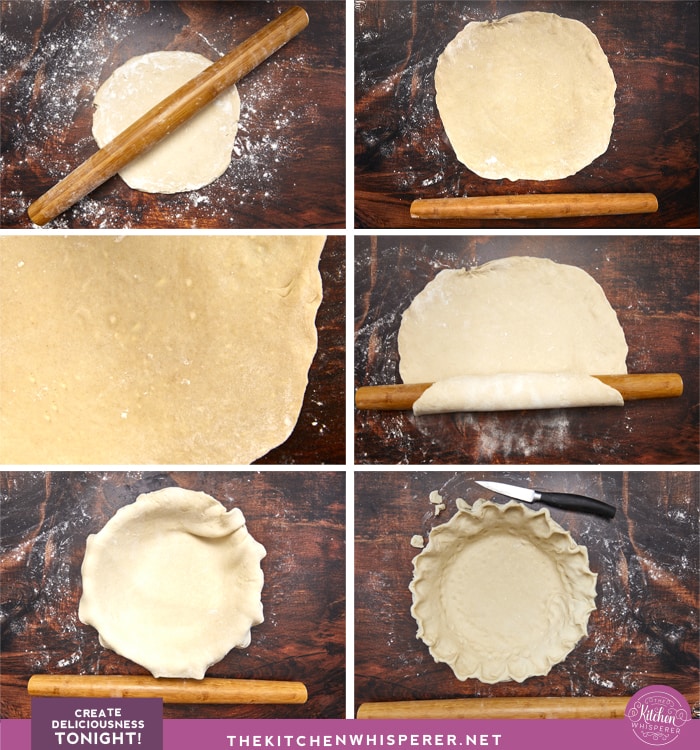
- Place the rolling pin at the base of the circle and gently roll up the dough on the rolling pin.
- Transfer the pin over top the pie plate and unroll. Gently push the dough into place ensuring it touches the bottom and sides.
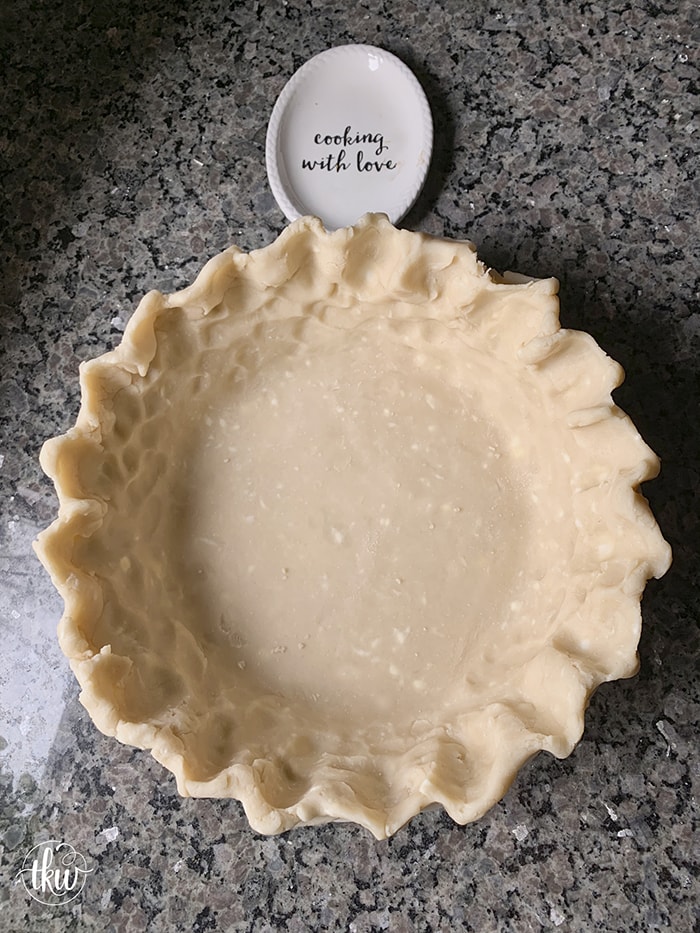
- Decorate the edges by crimping, pinching, pressing with a fork, and trim any excess off with a paring knife.
- Place the pie dish into the fridge for about 15-30 minutes to allow the dough to rest and the fat to solidify.
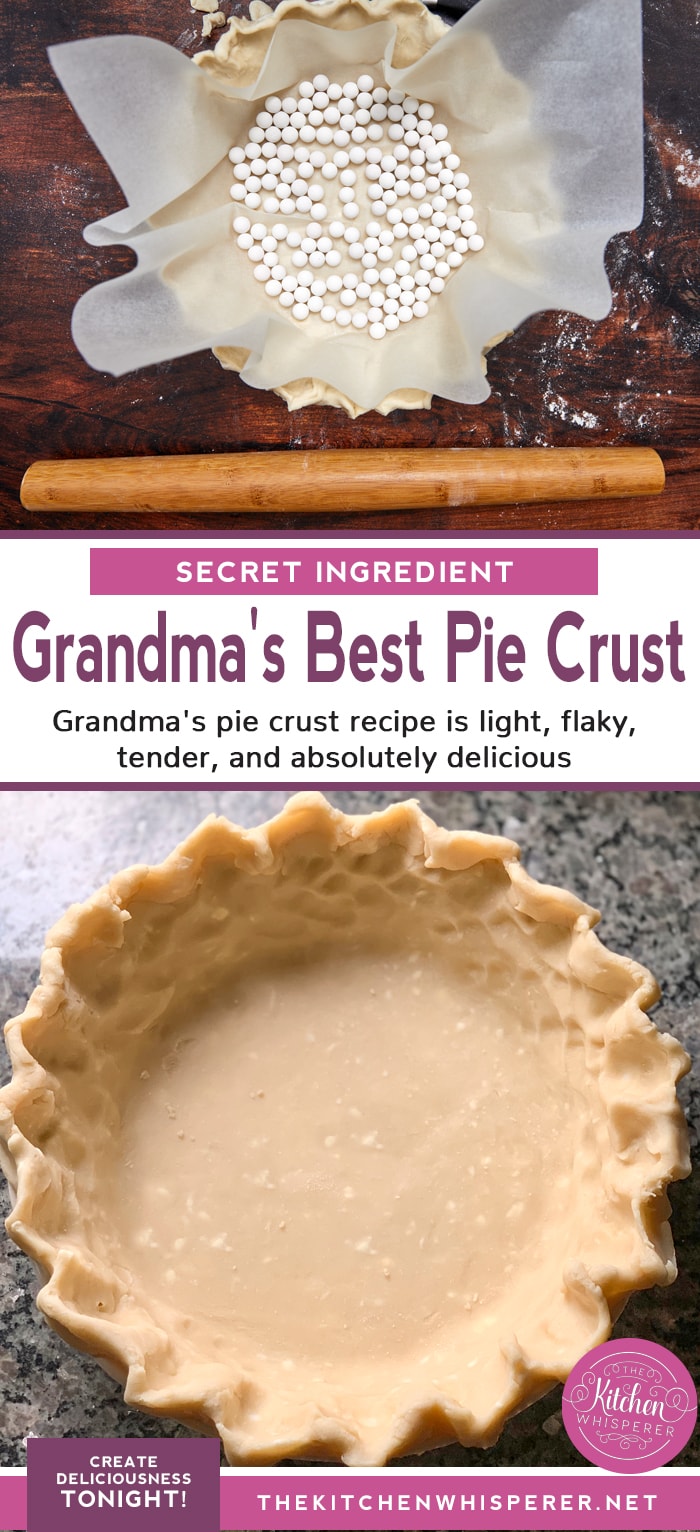
Blind-Baking Pie Crusts
Have you ever made a pie crust that only the crust needed baked but not the filling? Think pudding pie. Well, this type of baking is called “Blind-Baking”.
The best way to do this is to do 2 things:
- Poke the bottom all over with a fork. Don’t worry about the holes as they will seal up as they bake.
- PIE WEIGHTS!
Poking the holes with a fork helps prevent the crust from bubbling up and not baking flat on the bottom.
Pie weights prevent the crust from forming air pockets and rising up as it bakes as well as prevents it from shrinking down the sides.
- Bake in a 400 F oven for 15 minutes.
- Remove the parchment and the pie weights (watch as they will be hot). Poke holes in the bottom with a fork.
- Return to the oven and bake for 5-20 minutes. This will depend if you’re par-baking or fully baking.

Pie Weight Substitutions
It used to be that pie weights were crazy expensive so folks would resort to all types of things – dried beans, foil with pennies, or rice.
Now, pie weights are about $5. For a 9″ pie pan, get at least 2 packages.
If you can’t swing the 10-$15 you can most definitely use dried beans. BUT keep in mind if you use beans. Once you “bake” them like this, you cannot cook them for eating beans later. However, you can most certainly save those beans and use them as pie weights over and over. Just store them, once cooled, in a container or a cheesecloth bag.
Freezing Pie Dough
- Once the disk is shaped, wrap tightly in plastic wrap, place in a freezer-safe bag for up to 3 months.
- To use, remove from the freezer and place in the fridge to thaw overnight.
- Once thawed, roll out and bake per the directions.
Grandma’s Best Pie Crust

Grandma’s pie crust recipe is light, flaky, tender, and absolutely delicious using her secret tips that have never failed me!
- Prep Time: 10
- Total Time: 10 minutes
- Yield: One – 9″ pie shell
- Category: desserts, pastry, Pies
- Method: oven
- Cuisine: desserts, pastry, pies
Ingredients
- 203.125 grams or 1 1/2 cups plus 2 tablespoon flour – cold
- 12.5 grams or 1 tablespoon sugar
- 1/2 teaspoon salt
- 8 tablespoon unsalted butter, cut into small cubes and very, very cold
- 3 tablespoon shortening (cold and not butter flavored)
- 3 tablespoon cold water, or as needed
- 2 tablespoon vodka, cold 80 proof
- Ice cubes
Instructions
- Place the water and vodka in a cup and add 1-3 ice cubes to keep cold. In a food processor fitted with the dough blade, add the butter, shortening, flour, sugar, and salt. Pulse 8 to 12 times, until the butter is the size of peas.
- With the food processor running, pour in the water and vodka (not the ice) until it forms a ball. This should take 10-15 seconds at most.
- On a floured surface, dump out the dough and quickly shape into a round disk. Wrap in plastic wrap and refrigerate for 30 minutes.
- After 30 minutes, place the unwrapped disk on a floured board and gently roll into a circle starting from the center to the outside, turning a quarter turn and flouring the disk/rolling pin until the dough is larger than your pan. For a 9″ pie pan, roll into a 12″ circle. Allow to rest for 5 minutes so the gluten can relax again.
- Gently roll up the dough onto the floured rolling pin and place it into a 9″ Pie Dish. Crimp/flute/trim the edges so the crust just barely fits over top.
- Place the pie pan with the crust in it back into the fridge for 15-30 minutes as this will help prevent shrinkage.
- If par-baking (blind-baking) the crust before you fill it, add parchment paper and fill with pie weights. and bake at 400F for 15 minutes. Remove the parchment, weights, poke holes in the bottom, and bake for 5-20 minutes. This will depend if you’re par-baking or fully baking.
Notes
*Time does not include resting/chilling


Leave a Reply