Find the recipe card at the end of the post. Make sure to read the content as it contains chef tips,
substitution options, and answers to FAQs to help you succeed
the first time around!
Posts may contain affiliate links that help enable me to continue to provide you with free recipes. As an Amazon Associate, I earn from qualifying purchases. Please see my Privacy Policy for details.
It’s Hatch Chile Season and today I’m teaching you how to roast these at home! It’s super easy and it allows you to enjoy that amazing roasted flavor all year long!
What Are Hatch Chile Peppers?
This is one of those “is this really even a recipe?” type of posts. It is and it isn’t. I think of this more as foundational training or a ‘base’ recipe that, once you follow these instructions, you can create unlimited follow-on recipes.
I LOVE Hatch Chile peppers. They, depending on if you get mild or hot, can add just a hint of heat to a good bit of any dish you’re trying to wake up.
Well, it’s actually a generic name for peppers grown and harvested in New Mexico; specifically the Hatch Valley region of New Mexico.
As you can see, they are long, green, and full of flavor. They have a meaty-type flesh that varies in heat. On the Scoville scale, they are below the heat of a jalapeno though some of the hot hatch chile peppers can be close in heat. I’d say they are closer to a poblano or ancho chile pepper heat-wise. However, that flavor is undeniable! There’s a reason why true hatch chile peppers are loved so intensely!
I get mine from my friends over at Melissa’s Produce. I absolutely LOVE LOVE LOVE their products!
So let’s talk about how to roast/grill Hatch Chile peppers!
In this post, you’ll see I grilled them only because it was 114 F here in Arizona and there was no way I was turning on my oven to roast these. But no worries, I’ll show you later down how to roast these in the oven.
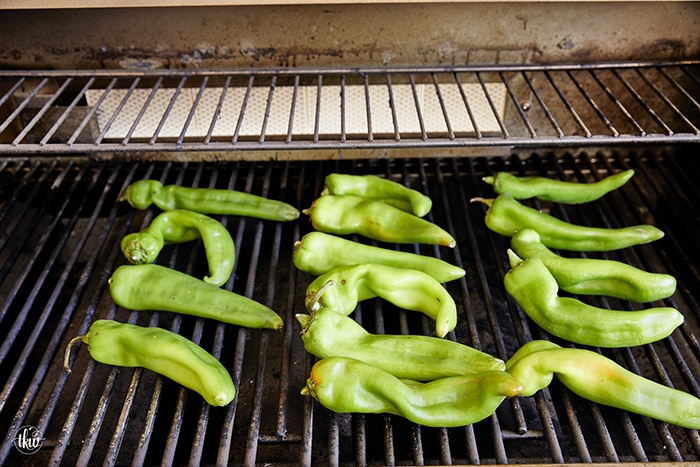
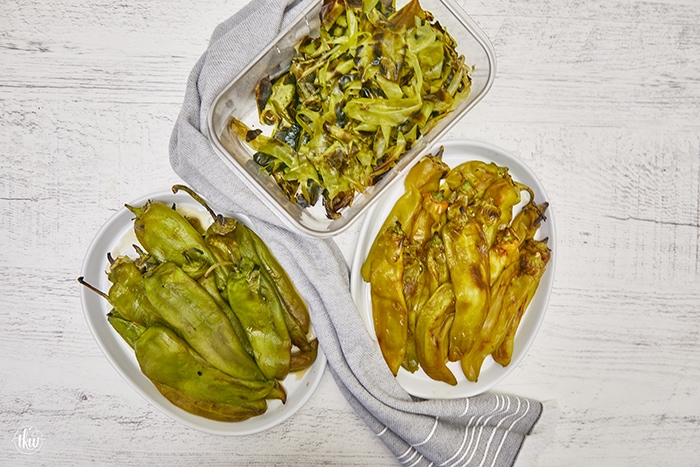
If you look at the picture below, you’ll see 2 different colored peppers – deeper, vibrant green on the left and more of a yellow-green on the right. The ones on the left are mild and the ones on the right are hot. Unlike shishito peppers, you can tell just by looking at the peppers which are hot and which are mild. No Russian Roulette here!
Fire up the grill to medium heat and place peppers directly on the clean grill grates.
After a few minutes, you’ll notice the skin starting to blister and char. Using tongs, carefully flip the peppers allowing the flames/heat to hit all sides.
This part truly only takes minutes to do. Don’t be alarmed if you hear ‘hissing’ or ‘popping’. The first time I ever heard that it freaked me out as I had no idea what it was. That hissing/popping is merely air that’s trapped between the skin and the flesh expanding and then eventually popping out.
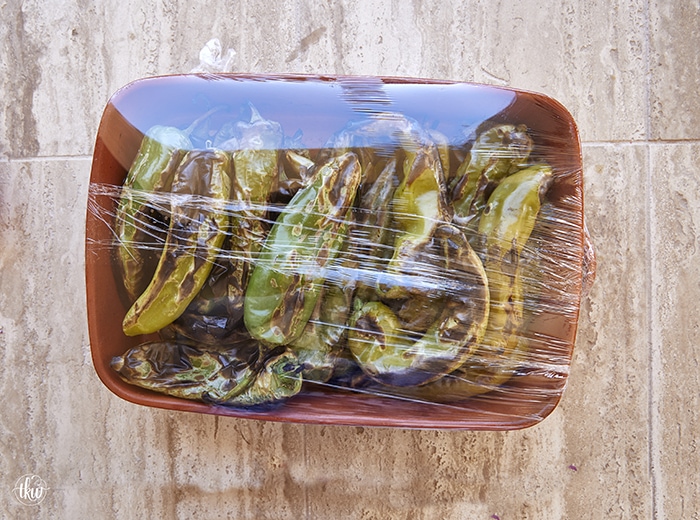
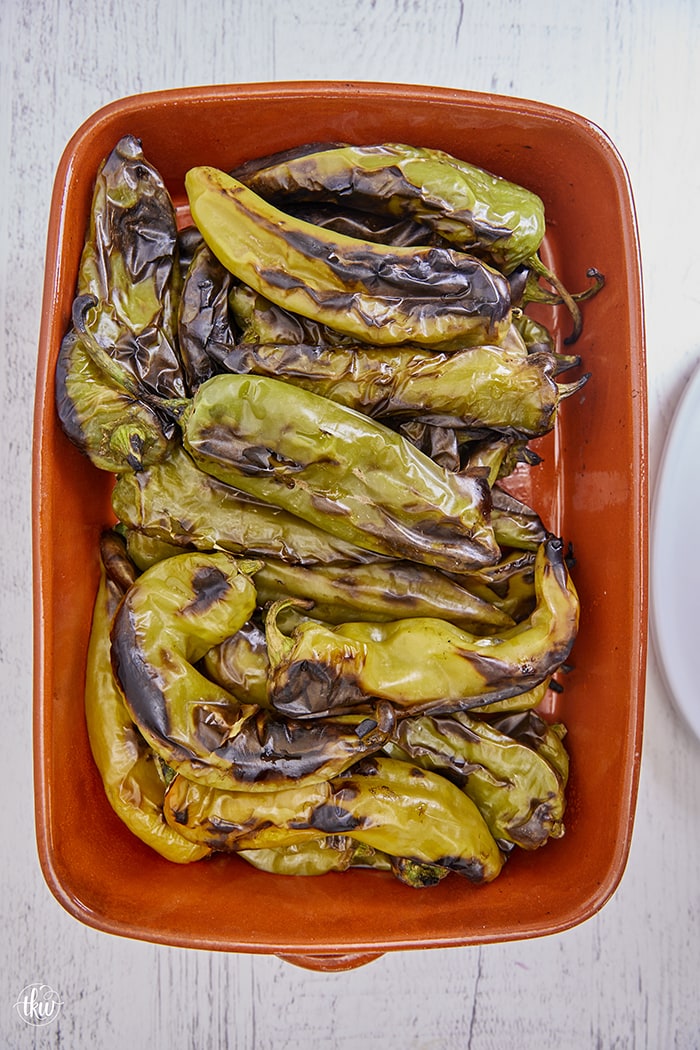
After all of the sides have been charred, immediately transfer the peppers to a heat-safe dish and cover with plastic wrap.
That plastic wrap will now help ‘sweat’ the peppers to remove any last bit of skin that may still be attached to the pepper.
Allow the peppers to sweat for 15 minutes before attempting the remove the skin.
Can you eat Hatch Chile Pepper Skin?
Technically yes, you can but you may not want to. Many of these chiles are thicker than most which can make them tough to chew/digest. They are fibrous and can sometimes be bitter.
Peeling Hatch Chiles
This is one thing I actually enjoy doing though I will strongly advise you, if you have sensitive skin, wear gloves when peeling these – especially the hot ones.
I was that weird kid that, in kindergarten would put Elmer’s glue on the back of her hand, let it harden, and then peel it off. No real reason why, I just enjoyed it. And if you’re one of those that like peeling folks that are sunburned, this is right up your alley.
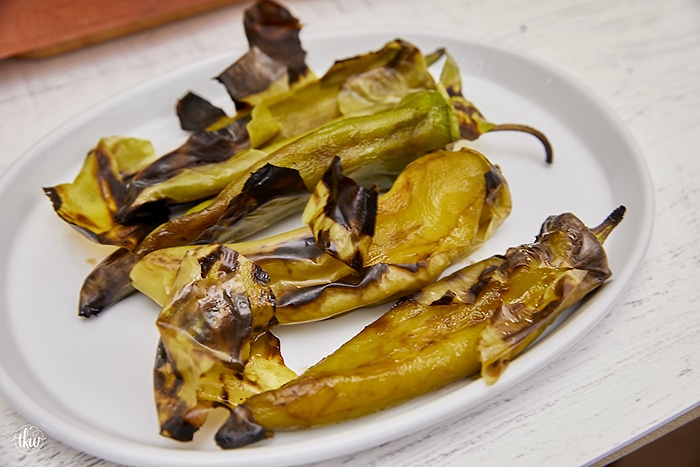
With gloved hands, pick up a pepper (watch as they are delicate now) and carefully pull the skin off. If you’ve charred them well and let them sweat, you should have no problems pulling the skin off.
Chef’s Tip about Peeling Hatch Chiles
If you find that you have to fight to peel the skin off you can do one of the following:
Under warm running water, try peeling the pepper. The water can help speed up the peeling process. OR
Place the peppers in a covered microwave dish and heat in 15-second increments. This should help warm the pepper enough to help sweat the skin off.
Storing Roasted Hatch Chile Peppers
Once all of the skin is removed, you can discard that and you’re left with gorgeous peppers! There are several ways to store these:
Pressure Can –find your favorite canning recipe and pressure can these for up to a year
Refrigerate – Roasted and peeled, will last up to a week in an air-tight container
Freezing– So this is where having a vacuum-sealer type machine really is needed. Peppers are one of those things that can turn ‘mushy’ if air hits them when frozen. Now granted these peppers are roasted and soft already but you still don’t want them mushy. What I did was scoop them out into 1/4 cup sizes (similar to those canned green chiles) and vacuum seals them that way. This way I had one can’s worth in every package.
Other ways to roast hatch chiles
Oven Broiled Roasted Hatch Chiles
Preheat the oven to 500 or set the broiler to HIGH.
Line a rimmed baking pan with foil. Place the clean, dry peppers on the tray.
Poke a few holes into the peppers (so they don’t explode).
Broil for 4-6 minutes on each side. Once charred all over, place in a heat-safe container and cover with plastic wrap.
Gas Stovetop Grilled Hatch Chiles
Place a wire baking rack over your burner grate. Put the flames to medium and place a pepper on top of the grates.
Char for 4-6 minutes per side. Once charred all over, place in a heat-safe container and cover with plastic wrap.
It’s Hatch Chile Season and today I’m teaching you how to roast these at home! It’s super easy and it allows you to enjoy that amazing roasted flavor all year long!
Author:TKWAdmin
Cooling & Peeling:20
Cook Time:5-10
Total Time:30 minutes
Category:vegetables, grilling, roasting, Mexican
Method:grilling, roasting, wood-fired
Cuisine:vegetables, grilling, roasting, Mexican
Ingredients
12 Fresh Hatch Chiles (obviously you can go with more)
Instructions
Fire up the grill to medium heat and place peppers directly on the clean grill grates.
After a few minutes, you’ll notice the skin starting to blister and char. Using tongs, carefully flip the peppers allowing the flames/heat to hit all sides.
After all of the sides have been charred, immediately transfer the peppers to a heat-safe dish and cover with plastic wrap.
That plastic wrap will now help ‘sweat’ the peppers to remove any last bit of skin that may still be attached to the pepper.
Allow the peppers to sweat for 15 minutes before attempting the remove the skin.
With gloved hands, pick up a pepper (watch as they are delicate now) and carefully pull the skin off. If you’ve charred them well and let them sweat, you should have no problems pulling the skin off.
Once the peppers are all peeled, store the peppers in a air-tight container for up to a week.
Notes
See the post for how to oven broil or roast these on the stovetop.
Just roasted up some hatch chillies and my tastebuds are straight-up doing a happy dance. So easy to do and the flavor is awesome. Thanks for a tasty recipe. 🔥🌶️🕺
Reading through the blog stories this morning and came across this one, I thought I would comment since you said it helps.
I love roasted chiles of any kind really. Anaheim’s (what you refer to as Hatch) are my favorite. When we lived in Colorado, we would travel down to the pepper farms in Pueblo during September when they are all harvesting and roasting, the smell is amazing 🙂 We would buy bushels of roasted peppers one time we bought 5 at once….big mistake way too much work to process. I miss those days.
I love doing pepper on the grill, it is a great way to elevate the flavors and add a nice smokey touch! Great tips on other ways to do these peppers! Thank you so much for sharing, I think it is a recipe!😁👌👍❤️


Leave a Reply